10. Do not add any image before first paragraph
—
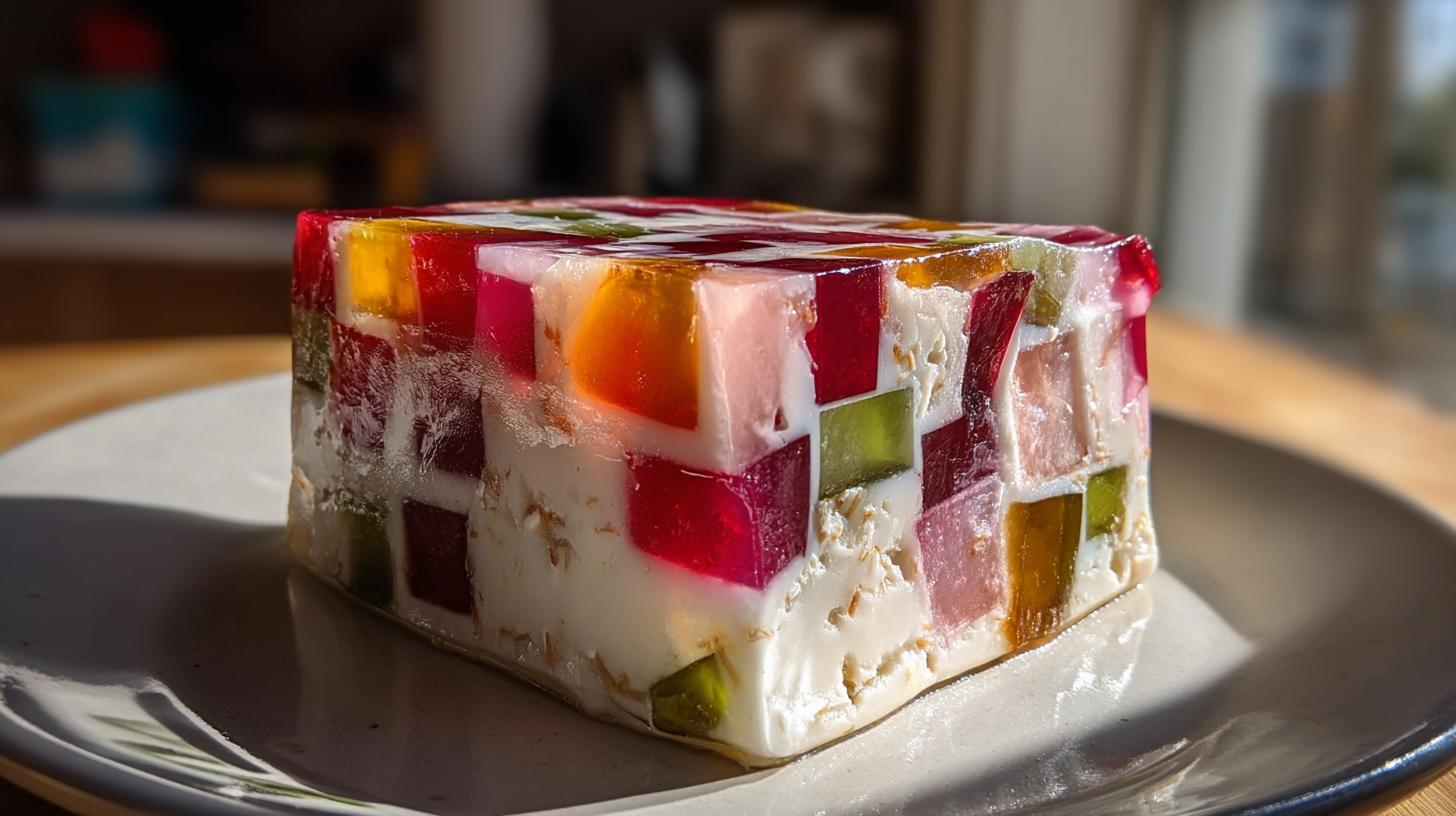
Okay, let’s talk about a dessert that just screams FUN: Stained Glass Gelatin Cake! Seriously, every time I bring this out, people's eyes just widen. It's like edible art, but way, way easier than it looks. I remember the first time I saw one at a potluck years ago – I was completely mesmerized by all the bright colors suspended in that creamy white base. I just HAD to get the recipe! And ever since, it's become one of my go-to treats for parties, holidays, or just when I need a little burst of happy in my kitchen. It's totally no-bake, super forgiving, and guaranteed to make everyone smile. Trust me, making this Stained Glass Gelatin Cake is almost as much fun as eating it!
Why You’ll Love This Stained Glass Gelatin Cake
Okay, so why is this Stained Glass Gelatin Cake just the absolute BEST? Let me count the ways!
- It’s a showstopper! Seriously, the vibrant colors suspended in that creamy base are just stunning. It looks way more complicated than it is, which is always a win in my book.
- Soooo easy! No oven required, just a little patience for chilling. If you can boil water and whisk, you can make this!
- Pure joy. It’s just a happy dessert! Perfect for birthdays, holidays, picnics, or just a Tuesday when you need a little cheer.
- Kid-friendly! Both to make (kids LOVE helping with the colored gelatin) and to eat.
Honestly, it’s a dessert everyone gets excited about. Every single time!
Essential Ingredients for Your Stained Glass Gelatin Cake
Alright, let’s get down to business! The beauty of this Stained Glass Gelatin Cake is that it uses really simple stuff you can find at any grocery store. But getting the *right* stuff and knowing *why* is key to that perfect, vibrant look and creamy texture. Here’s what you’ll need:
First up, you’ll want 4 (3 ounce) boxes of flavored gelatin. This is where the magic happens! Pick bright, contrasting colors like cherry red, lime green, lemon yellow, and maybe a gorgeous blue raspberry. The bolder the colors, the more stunning your “stained glass” will be!
You’ll need 4 cups of boiling water to dissolve those colored gelatins initially, and then 2 cups of cold water to add to each color batch after. This gets them ready to set up firm.
For that dreamy, creamy white base, grab 1 (14 ounce) can of sweetened condensed milk. Make sure it’s *sweetened condensed*, not evaporated milk – totally different! And you’ll need another 1 cup of cold water to mix with that.
Finally, the glue that holds it all together! You’ll need 2 envelopes of unflavored gelatin. This is what gives the creamy base its structure so it can hold those colorful cubes suspended. Easy peasy, right?
Equipment Needed for Stained Glass Gelatin Cake Success
Good news! You don’t need any fancy gadgets for this Stained Glass Gelatin Cake. Just some basic kitchen stuff you probably already have kicking around. You’ll need a few different bowls for mixing up your colored gelatins, plus some shallow dishes or pans (like an 8×8 brownie pan or even a baking sheet with sides) to let those colors set up flat so they’re easy to cut. A good old whisk is essential for dissolving everything smoothly. You’ll also need a microwave (or a small saucepan on the stove) to melt the unflavored gelatin. And finally, your main stage: a 9×13 inch pan or a pretty Bundt pan to mold the whole glorious thing!
Crafting Your Stained Glass Gelatin Cake: Step-by-Step Instructions
Okay, deep breaths! This might seem like a lot of steps, but I promise, none of them are hard. It’s mostly just waiting around for things to set, which is the hardest part for me because I get so excited! Follow these steps, and you’ll have a stunning Stained Glass Gelatin Cake that looks like you spent hours on it (your secret’s safe with me!).
Here’s the breakdown:
Preparing the Colored Gelatin for Stained Glass Gelatin Cake
This is where the vibrant ‘stained glass’ comes from! You need to give each color its moment to shine and set up properly. Get out those four separate bowls. In each one, you’ll dissolve one box of your flavored gelatin with 1 cup of *boiling* water. Whisk it really well until you don’t see any little granules anymore. Now, stir in 1/2 cup of *cold* water into each color. This helps cool it down and get it ready for setting.
Pour each beautiful color into its own shallow dish or pan. You don’t want it too deep because you need to cut cubes later. Pop these into the fridge. This is the first big chilling period! They need to be *firm* – totally set, no jiggly liquid centers. This usually takes at least 3-4 hours, but honestly, I often do this part the night before. Better safe than sorry!
Creating the Creamy Base for Your Stained Glass Gelatin Cake
While your colors are doing their thing in the fridge, you can get the creamy white base ready. Grab a medium-sized bowl and whisk together that can of sweetened condensed milk with 1 cup of cold water. Set that aside for a sec.
Now, for the unflavored gelatin – this is important! In a *separate* small bowl, sprinkle those two envelopes of unflavored gelatin over 1/2 cup of cold water. Don’t stir it right away! Just let it sit there for about 5 minutes. This is called ‘blooming’ and it helps it dissolve smoothly later. Once it looks kind of lumpy and absorbed, pop that little bowl in the microwave for about 30-60 seconds, just until it’s totally liquid and clear. Be careful, it gets hot! Whisk this dissolved unflavored gelatin into your condensed milk and water mixture. Whisk it until it’s completely combined and smooth.
Combining and Setting the Stained Glass Gelatin Cake
Okay, time for the fun part! Once your colored gelatins are super, *super* firm, take them out of the fridge. Use a knife to cut them into small cubes, maybe about half an inch or so. Don’t overthink it, just get a bunch of colorful little squares!
Now, gently fold those colored cubes into your creamy condensed milk mixture. And I mean *gently*! You don’t want to mash them all up. Just stir carefully until the cubes are pretty evenly distributed throughout the white base. This is where you start seeing that gorgeous ‘stained glass’ effect!
Pour this beautiful mixture into your lightly greased 9×13 inch pan or Bundt pan. Now, back to the fridge it goes! This is the final chill time, and it needs to be completely set before you even *think* about trying to unmold it. This usually takes at least 4 hours, but overnight is even better. To serve, you might need a little help getting it out. A quick dip of the bottom of the pan in warm water for just a few seconds can help loosen the edges. Then, and this is the exciting (and sometimes nerve-wracking) part, carefully invert it onto your serving plate! Ta-da!
Tips for a Perfect Stained Glass Gelatin Cake
Okay, so you’ve got the basic steps down, but here are a few little tricks I’ve picked up along the way to make your Stained Glass Gelatin Cake absolutely perfect every single time. First off, don’t be shy with your colors! Using really vibrant, contrasting shades makes the “stained glass” effect pop so much more. Think bright reds, blues, greens, and yellows. Also, and this is crucial, make *sure* those colored gelatins are totally, completely set before you cut them. If they’re still a little soft, they’ll just turn into a colorful slush when you fold them in, and you won’t get those distinct cubes. And finally, patience is your friend! Give the final cake *plenty* of time to chill and set up. Trying to unmold it too early is a recipe for disaster (and a sad, broken cake!). Overnight is always best if you can swing it.
Stained Glass Gelatin Cake Frequently Asked Questions
Okay, so you’ve got questions, I’ve got answers! Making this Stained Glass Gelatin Cake is pretty straightforward, but a few things always pop up. Here are some common questions I get asked:
Can I use sugar-free gelatin for Stained Glass Gelatin Cake?
Absolutely! If you’re looking to cut down on sugar, swapping out the regular flavored gelatin for sugar-free versions works just fine. The texture and setting should be similar. Just make sure the unflavored gelatin you use for the creamy base is also sugar-free if that’s your goal.
How long does Stained Glass Gelatin Cake need to chill?
This is the part that requires patience! The initial colored gelatins need at least 3-4 hours to set firmly before you cut them into cubes. Once you’ve assembled the whole Stained Glass Gelatin Cake with the creamy base and the colored cubes, it needs to chill for a minimum of 4 hours, but honestly, overnight is really the best bet to ensure it’s completely set and easy to handle.
How do I easily unmold my Stained Glass Gelatin Cake?
Unmolding can be a little tricky sometimes, but there’s a simple trick! The easiest way is to briefly dip the bottom of your pan (whether it’s a 9×13 or a Bundt) into warm water for just a few seconds. Don’t let the water get *into* the cake! This slightly loosens the edges. Then, place your serving plate upside down over the pan and flip them both over together. Give it a gentle shake, and it should release beautifully. If it’s stubborn, dip it again for just another second or two.
Serving Suggestions for Your Stained Glass Gelatin Cake
Honestly, this Stained Glass Gelatin Cake is so pretty and flavorful, it really doesn’t *need* anything else! It stands completely on its own. But, if you want to add a little something extra, a dollop of fresh whipped cream on the side is always a winner. The creamy sweetness is lovely with the fruity gelatin. Or, for a touch of freshness, some fresh berries or sliced fruit like strawberries or kiwi look beautiful next to all those vibrant colors!
Storing and Reheating Stained Glass Gelatin Cake
Okay, so you miraculously have leftovers of this amazing Stained Glass Gelatin Cake (it doesn’t happen often in my house!). Storing it is super simple. Just keep it covered tightly in the fridge. Either leave it in the pan you made it in and cover it with plastic wrap or foil, or if you’ve already unmolded it, put it in an airtight container. It’ll stay fresh and delicious for about 3-4 days. As for reheating? Nope! This is a lovely, chilled dessert, so definitely don’t try to heat it up. Just grab a slice straight from the cold!
Estimated Nutritional Information
Okay, so while we’re mostly focused on the fun and deliciousness of this Stained Glass Gelatin Cake, I know some folks like to have an idea of what they’re getting nutrition-wise. Now, keep in mind, this is just an estimate! It can totally change depending on the exact brands of gelatin and condensed milk you use. But based on the recipe divided into about 12-15 servings, here’s a rough idea per slice:
- Calories: Around 250
- Sugar: Roughly 40g (Yep, it’s dessert!)
- Sodium: About 50mg
- Fat: Around 4g
- Saturated Fat: Roughly 2g
- Unsaturated Fat: 0g
- Trans Fat: 0g
- Carbohydrates: About 50g
- Fiber: 0g
- Protein: Roughly 5g
- Cholesterol: Around 10mg
So, it’s definitely a treat, but hey, life’s too short not to enjoy a little something sweet, right? Just enjoy it in moderation and savor every colorful, creamy bite!
Share Your Stained Glass Gelatin Cake Creations
Okay, now it’s YOUR turn! I absolutely *love* seeing how this recipe turns out for you. Did you use your favorite colors? Did you try a fancy Bundt pan? Please, please, please share your Stained Glass Gelatin Cake masterpieces! Leave a comment below and tell me how it went, or even better, snap a pic and share it on social media! Tag me if you can, I’d be thrilled to see your beautiful, colorful creations!
Print
Glorious Stained Glass Gelatin Cake Recipe
- Total Time: 8 hours 35 minutes
- Yield: 12-15 servings 1x
Description
A vibrant and festive gelatin cake made with different colors of gelatin suspended in a creamy white base.
Ingredients
- 4 (3 ounce) boxes flavored gelatin
- 4 cups boiling water
- 2 cups cold water
- 1 (14 ounce) can sweetened condensed milk
- 1 cup cold water
- 2 envelopes unflavored gelatin
Instructions
- Dissolve each box of flavored gelatin in 1 cup of boiling water in separate bowls. Stir in 1/2 cup cold water into each bowl.
- Pour each color of gelatin into a shallow dish or pan. Refrigerate until firm, at least 3-4 hours or overnight.
- Once firm, cut the set gelatin into small cubes.
- In a medium bowl, whisk together the sweetened condensed milk and 1 cup cold water.
- In a separate small bowl, sprinkle the unflavored gelatin over 1/2 cup cold water. Let it bloom for 5 minutes.
- Heat the bloomed unflavored gelatin in a microwave for 30-60 seconds, or until dissolved. Stir into the condensed milk mixture.
- Gently fold the colored gelatin cubes into the condensed milk mixture.
- Pour the mixture into a lightly greased 9×13 inch pan or a bundt pan.
- Refrigerate until completely set, at least 4 hours or overnight.
- To serve, dip the bottom of the pan in warm water for a few seconds to help loosen the gelatin. Invert onto a serving plate.
Notes
- Use a variety of bright colors for a visually appealing cake.
- Ensure the flavored gelatins are fully set before cutting into cubes.
- Chill the cake thoroughly before attempting to unmold.
- Prep Time: 30 minutes
- Cook Time: 5 minutes
- Category: Dessert
- Method: No Bake
- Cuisine: American
Nutrition
- Serving Size: 1 slice
- Calories: 250
- Sugar: 40g
- Sodium: 50mg
- Fat: 4g
- Saturated Fat: 2g
- Unsaturated Fat: 0g
- Trans Fat: 0g
- Carbohydrates: 50g
- Fiber: 0g
- Protein: 5g
- Cholesterol: 10mg