Why This Recipe Works
I’ve messed around with honey garlic chicken recipes for years, trying to get that perfect balance of sticky, sweet, and savory. Most recipes I’ve tried either end up too sweet, with a cloying honey flavor, or the garlic burns in the air fryer before the chicken is cooked. This recipe solves both problems. By marinating the chicken in cornstarch, it gets a light, crispy coating that protects it from drying out in the air fryer’s blast of heat. Simmering the honey garlic sauce separately lets the flavors meld without burning, creating that glossy, irresistible glaze.
Why You’ll Love This Air Fryer Honey Garlic Chicken
- The sticky honey garlic glaze is seriously delicious.
- Air frying gives you crispy chicken that stays juicy inside.
- It’s so quick and easy, ready in under 30 minutes.
- Serve it with rice, noodles, or veggies — a total family favorite.
- Even picky eaters love the sweet and savory combo, making it a family favorite.
What You’ll Need
Main Protein / Base
- Boneless, skinless chicken thighs: I will always reach for chicken thighs. They stay juicy in the air fryer, but chicken breasts work too. If using breasts, reduce the cooking time slightly so they don’t dry out.
- Cornstarch: This helps create a light, crispy coating on the chicken.
Aromatics
- Garlic: Freshly minced garlic is essential for that authentic and pungent honey garlic flavor. Don’t skimp — use the full amount!
- Ginger (optional): A touch of grated ginger adds warmth to the sauce.
Liquid / Sauce
- Honey: You need a good quality honey for the best results, providing sweetness.
- Soy sauce: Low-sodium soy sauce is my go-to to control the saltiness of the sauce, adding a savory umami depth.
- Rice vinegar: A touch of acidity balances the sweetness, so don’t forget it.
- Sesame oil: Just a little adds a nutty aroma.
Toppings
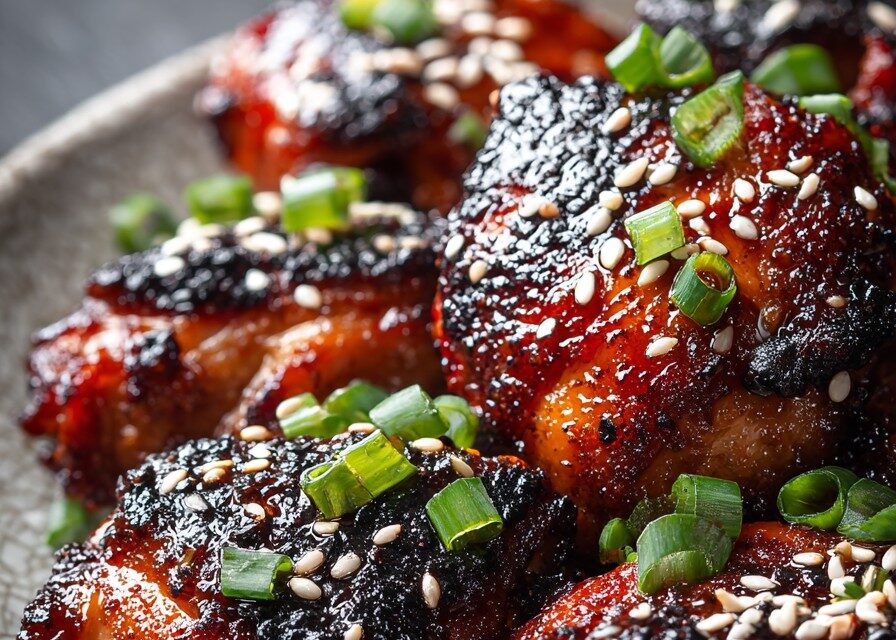
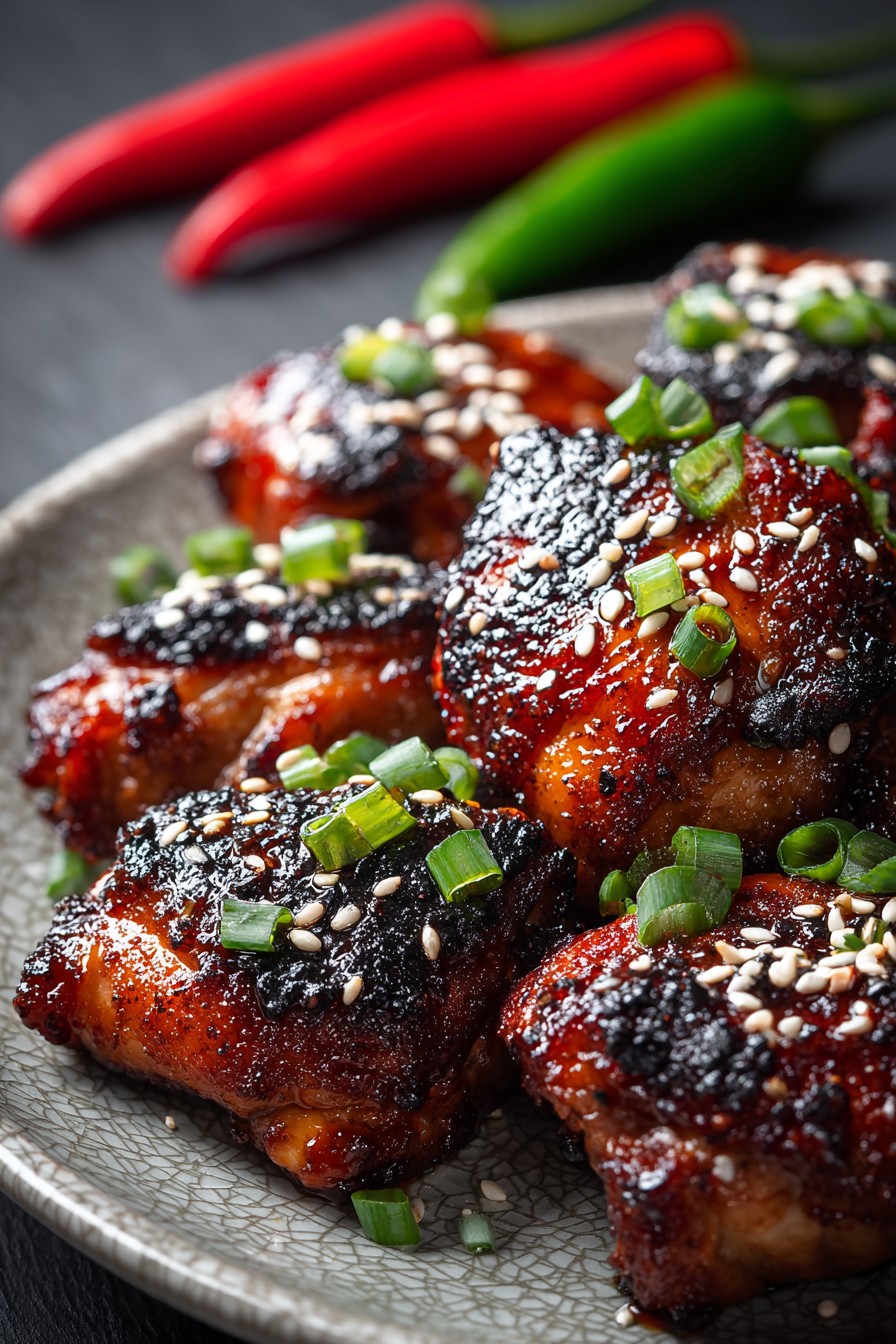
- Sesame seeds: For a beautiful garnish.
- Green onions: Thinly sliced, they give a fresh, bright finish.

How to Make Air Fryer Honey Garlic Chicken
Prepping and Marinating the Chicken
- Step 1: Cut Chicken. Cut the chicken thighs into 1-inch pieces. Place them in a bowl.
Pro Tip: Uniform size is key for cooking evenly, so try to get all the pieces roughly the same size. Smaller pieces can be cut in half, and bigger pieces can be cut into quarters. - Step 2: Add Marinade Ingredients. Add cornstarch, salt, and pepper to the chicken. Toss to coat evenly.
Pro Tip: Make sure every piece is coated in cornstarch. The cornstarch acts as a binder, ensuring the glaze sticks to the chicken while also protecting it from the dry heat. - Step 3: Marinate. Let the chicken marinate for at least 15 minutes, or up to an hour in the refrigerator. Don’t skip the marinating time; it really makes a difference in the texture of the chicken.
Pro Tip: The longer the chicken marinates, the more tender it will be. If you’re short on time, even 15 minutes will help, but for the best results, aim for at least 30 minutes. You can also marinate it overnight in the fridge.
Cooking the Chicken
- Step 1: Preheat Air Fryer. Preheat your air fryer to 400°F (200°C). This is important for even cooking and a crispy exterior.
Pro Tip: Preheating is crucial! It ensures that the air fryer is at the right temperature when you add the chicken, resulting in even cooking and a better texture. - Step 2: Arrange Chicken. Place the marinated chicken in a single layer in the air fryer basket, making sure not to overcrowd it. You may need to cook in batches depending on the size of your air fryer; nobody wants mushy instead of crispy chicken!
Pro Tip: Overcrowding the air fryer is a common mistake. When the basket is too full, the chicken steams instead of fries. Work in batches to ensure each piece gets crispy. - Step 3: Air Fry. Air fry for 8–10 minutes, flipping halfway through, until the chicken is cooked through and lightly golden brown.
Pro Tip: The cooking time can vary depending on your air fryer, so keep an eye on the chicken and adjust the time accordingly. - Step 4: Check Temperature. Use a meat thermometer to ensure the internal temperature reaches 165°F (74°C). It’s worth the few seconds for peace of mind.
Pro Tip: Always use a meat thermometer to ensure that the chicken is cooked through. This is the only way to be sure it’s safe to eat.
Adding Sauce and Finishing Touches
- Step 1: Coat the Cooked Chicken. Remove the cooked chicken and add it directly to the sauce. Make sure every piece is coated thoroughly.
Pro Tip: I like to use a large bowl when coating the chicken in the sauce. It helps ensure that every piece is evenly covered. - Step 2: Air Fry Again. Return the honey garlic chicken to the air fryer for 2–3 minutes for a stickier texture. Keep a close eye on it during this step to prevent burning.
Pro Tip: This second air-frying step is optional, but it really helps the sauce caramelize and stick to the chicken. Watch carefully, as the sugars in the honey can burn quickly. - Step 3: Garnish and Serve. Garnish with sesame seeds and sliced green onions before serving.
Pro Tip: Don’t skip the garnishes! Sesame seeds add a nice nutty flavor and some visual appeal, while the green onions provide a fresh, bright finish.
Making the Honey Garlic Sauce
Combine honey, soy sauce, rice vinegar, minced garlic, and sesame oil in a small saucepan. Bring to a simmer over medium heat and cook for 2–3 minutes, or until the sauce has thickened slightly, stirring constantly. You’ll know it’s ready when it coats the back of a spoon. You can make the honey garlic sauce a day or two in advance and store it in an airtight container in the refrigerator.

Ingredient Notes and Swaps
Let’s deep-dive into some of the ingredients and discuss substitutions.
- Chicken Thighs vs. Chicken Breast: While chicken thighs bring more fat and flavor, chicken breast is a leaner option. Either will work, but adjust cooking times accordingly. If using chicken breasts, consider pounding them to an even thickness for even cooking and start checking for doneness a little before the recipe indicates. For even more flavor with chicken breasts, try brining them briefly before marinating.
- Honey Variations: Explore different types of honey! Clover honey offers a mild, floral sweetness, while buckwheat honey has a bolder, molasses-like flavor. Each honey type will bring a unique nuance to your sauce. Manuka honey, while expensive, has a wonderful unique flavor. Maple syrup isn’t a direct substitute, but can be used in a pinch along with a tiny squeeze of lemon juice, and it will have a different flavor.
- Soy Sauce Options: Using low-sodium soy sauce is important as it allows more control over the final saltiness of the dish. If you only have regular soy sauce, reduce the amount used and taste-test the sauce before adding more. For a gluten-free version, use tamari. Coconut aminos are another good option, though they are slightly sweeter than soy sauce.
- Rice Vinegar Alternatives: If you don’t have rice vinegar, apple cider vinegar or white wine vinegar can be used as substitutes. Use them sparingly, as they have a stronger flavor, and taste as you go. A squeeze of fresh lemon or lime juice can also add a touch of acidity.
- Spice It Up: Add a pinch of red pepper flakes to the sauce for a little heat. You can also add a dash of sriracha or a small piece of finely chopped fresh chili. For a more complex heat, try using a chili garlic sauce, but reduce the amount of fresh garlic in the recipe accordingly.
Tips for the Perfect Glaze
Achieving the perfect sticky, glossy glaze is key to this dish. Here are a few tips:
- Simmer, Don’t Boil: Simmering the sauce gently allows the flavors to meld without burning the honey. High heat can cause the honey to crystallize, resulting in a grainy texture.
- Stir Constantly: Stirring prevents the sauce from sticking to the bottom of the pan and burning. Use a whisk to ensure even heating and prevent lumps from forming.
- Thickness Test: The sauce is ready when it coats the back of a spoon. To test, dip a spoon into the sauce, then run your finger across the back of the spoon. If the sauce stays divided and doesn’t immediately run back together, it’s thick enough. Another test is to drizzle a small amount of sauce onto a cold plate; it should set up quickly.
- Adjust Sweetness: Taste the sauce and adjust the sweetness if needed. If you prefer a less sweet sauce, add a splash of soy sauce or rice vinegar. A tiny pinch of salt can also help balance the sweetness.
- Fresh Garlic: Fresh garlic is unbeatable for its flavor. Avoid garlic powder, which doesn’t offer the same pungent flavor. If you must use garlic powder, start with a small amount and taste as you go.
How to Customize Your Air Fryer Honey Garlic Chicken
This recipe is a great base for customization. Here are a few ideas to get you started:
- Vegetable Boost: Add some chopped vegetables to the air fryer along with the chicken. Broccoli florets, bell peppers, and onions all work well. Toss them with a little oil and seasoning before adding them to the air fryer. Other great options include zucchini, carrots, and snap peas. Just be mindful of cooking times, as some vegetables cook faster than others.
- Spice Level: Adjust the amount of red pepper flakes to your liking. For a milder flavor, omit them altogether. For a spicier dish, use a generous pinch. You can also add a few drops of your favorite hot sauce after cooking.
- Citrus Zest: Add a teaspoon of orange or lemon zest to the sauce for a bright, citrusy flavor. The zest adds a subtle aroma and enhances the other flavors in the dish. Use a microplane to zest the citrus fruit, being careful not to grate the white pith, which is bitter.
- Add a Kick: A dash of your favorite hot sauce can add a surprising twist. Consider different hot sauces with varying flavor profiles, such as a smoky chipotle sauce or a tangy vinegar-based sauce.
- Make It a Bowl: Serve the chicken over rice or quinoa with your favorite toppings, such as avocado, shredded carrots, and a drizzle of sriracha mayo. Consider adding some pickled vegetables for a tangy contrast. A sprinkle of toasted nuts can add a nice crunch.
Troubleshooting
Even with the best recipes, things can sometimes go wrong. Here are some common problems and how to fix them:
- Chicken is Dry: Make sure not to overcook the chicken. Chicken breasts, in particular, can dry out easily. Use a meat thermometer to ensure it’s cooked to 165°F (74°C). Also, make sure you are using enough sauce to coat the chicken thoroughly. Another tip is to add 1 teaspoon of oil during the last 2 minutes of cooking. If the chicken is still dry, try marinating it for longer.
- Sauce is Too Thick or Too Thin: If the sauce is too thick, add a tablespoon of water or chicken broth to thin it out. If the sauce is too thin, continue simmering it until it reaches the desired consistency. A cornstarch slurry, 1 teaspoon cornstarch mixed with 1 tablespoon cold water, can also be used to thicken the sauce.
- Chicken is Sticking to the Air Fryer Basket: Lightly spray the air fryer basket with cooking spray before adding the chicken. You can also use parchment paper liners designed for air fryers. Make sure the chicken is not overcrowded, as this can also cause sticking.
- Burnt Garlic: Burnt garlic ruins the whole sauce. Be sure to keep the saucepan on a low simmer and stir consistently. Watch for the sauce to reach that perfect consistency coating the back of a spoon. If the garlic starts to brown too quickly, reduce the heat even further or remove the saucepan from the heat temporarily.
How to Serve It
Serve this Air Fryer Honey Garlic Chicken hot over rice or noodles. For a complete meal, add steamed broccoli or a simple salad — something green is always a welcome contrast. A sprinkle of red pepper flakes adds a nice touch of heat. The chicken tastes best served immediately, as the crispy coating can soften over time. Extra glaze for the top wouldn’t hurt, either!
Storage and Reheating
- Fridge: Store leftover chicken in an airtight container in the refrigerator for up to 3 days.
- Freezer: I don’t recommend freezing, as the texture will change upon thawing. The glaze can become gummy, and the chicken can get a bit watery. If you must freeze it, try to freeze it in a single layer on a baking sheet before transferring it to a freezer bag. This will help prevent the pieces from sticking together.
- Reheating: Reheat in the air fryer at 350°F (175°C) for 3–5 minutes, or until heated through. For best results, add a splash of water or broth to the container before reheating to prevent the chicken from drying out. And don’t skip preheating again for the best texture! You can also reheat it in the microwave, but the chicken will not be as crispy.
FAQ
- Can I use chicken breast instead of chicken thighs? Yes, you can use chicken breast. Do not overcook it, or it will become dry. Reduce the cooking time by a few minutes. Pounding the chicken to an even thickness is highly recommended.
- Can I make this recipe gluten-free? Yes, substitute the soy sauce with tamari. Don’t forget to double-check the other ingredients to make sure they are all gluten-free. Coconut aminos are another alternative to soy sauce.
- How do you prevent the chicken from sticking to the air fryer basket? Lightly spray the air fryer basket with cooking spray before adding the chicken. Parchment paper is another handy tool. Also, be sure not to overcrowd the basket.
Helpful References:
Related Recipes
- Hawaiian BBQ Pulled Pork
- 30 Minute Chicken Parmesan Pasta Recipe
- Watermelon Feta Bites With Mint Lime Drizzle
Air Fryer Honey Garlic Chicken
- Prep Time: 10
- Cook Time: 20
- Total Time: 30
- Yield: 4 servings 1x
- Category: Main Course
- Method: Air Frying
- Cuisine: Asian
Description
Air Fryer Honey Garlic Chicken is a weeknight dinner winner, delivering crispy, caramelized chicken coated in a sweet and savory glaze in under 30 minutes. This recipe makes it easy to have juicy chicken with a sticky glaze, all cooked perfectly in your air fryer—and it’s a cleanup breeze. It offers a perfect balance of sticky, sweet, and savory flavors. Serve it with rice, noodles, or veggies for a complete and satisfying meal.
Ingredients
- 1.5 lbs boneless, skinless chicken thighs (cut into 1-inch pieces)
- 2 tbsp cornstarch
- 4 cloves garlic (freshly minced)
- 1 tsp ginger (grated, optional)
- 1/4 cup honey (good quality)
- 2 tbsp low-sodium soy sauce
- 1 tbsp rice vinegar
- 1 tsp sesame oil
- 1 tbsp sesame seeds (for garnish)
- 2 green onions (thinly sliced, for garnish)
Instructions
- Cut Chicken: Cut the chicken thighs into 1-inch pieces. Place them in a bowl.
- Marinate: Add the cornstarch to the chicken and toss to coat evenly.
- Preheat Air Fryer: Preheat your air fryer to 400°F (200°C) for 5 minutes.
- Arrange Chicken: Place the chicken in a single layer in the air fryer basket, ensuring not to overcrowd. You may need to cook in batches.
- Air Fry Chicken: Air fry at 400°F (200°C) for 10 minutes.
- Flip Chicken: Flip the chicken pieces and continue to air fry for another 10 minutes, or until the chicken is cooked through and reaches an internal temperature of 165°F (74°C).
- Make Sauce: While the chicken is air frying, make the honey garlic sauce. In a small saucepan, combine the honey, soy sauce, rice vinegar, sesame oil, garlic, and ginger (if using).
- Simmer Sauce: Bring the sauce to a simmer over medium heat, stirring constantly. Cook for 3-5 minutes, or until the sauce has thickened slightly.
- Combine: Once the chicken is cooked, transfer it to a bowl. Pour the honey garlic sauce over the chicken and toss to coat.
- Garnish: Garnish with sesame seeds and green onions.
- Serve: Serve immediately over rice, noodles, or your favorite sides.
Notes
- Chicken Substitute: You can substitute chicken breasts for thighs, but reduce the cooking time slightly to prevent them from drying out.
- Make Ahead: The honey garlic sauce can be made up to 3 days in advance and stored in an airtight container in the refrigerator. Reheat before using.
- Storage: Store leftovers in an airtight container in the refrigerator for up to 3 days.
- Reheating: Reheat in the air fryer at 350°F (175°C) for 5-7 minutes, or until heated through. You can also microwave it for 1-2 minutes.
- Serving Suggestions: Serve with white rice, brown rice, quinoa, noodles, steamed broccoli, or a simple salad.
Nutrition
- Array