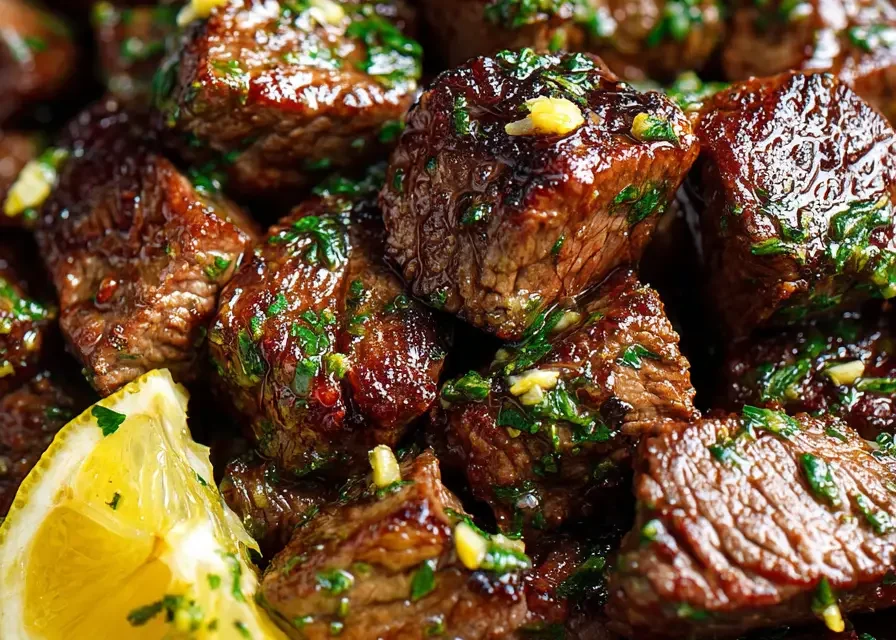
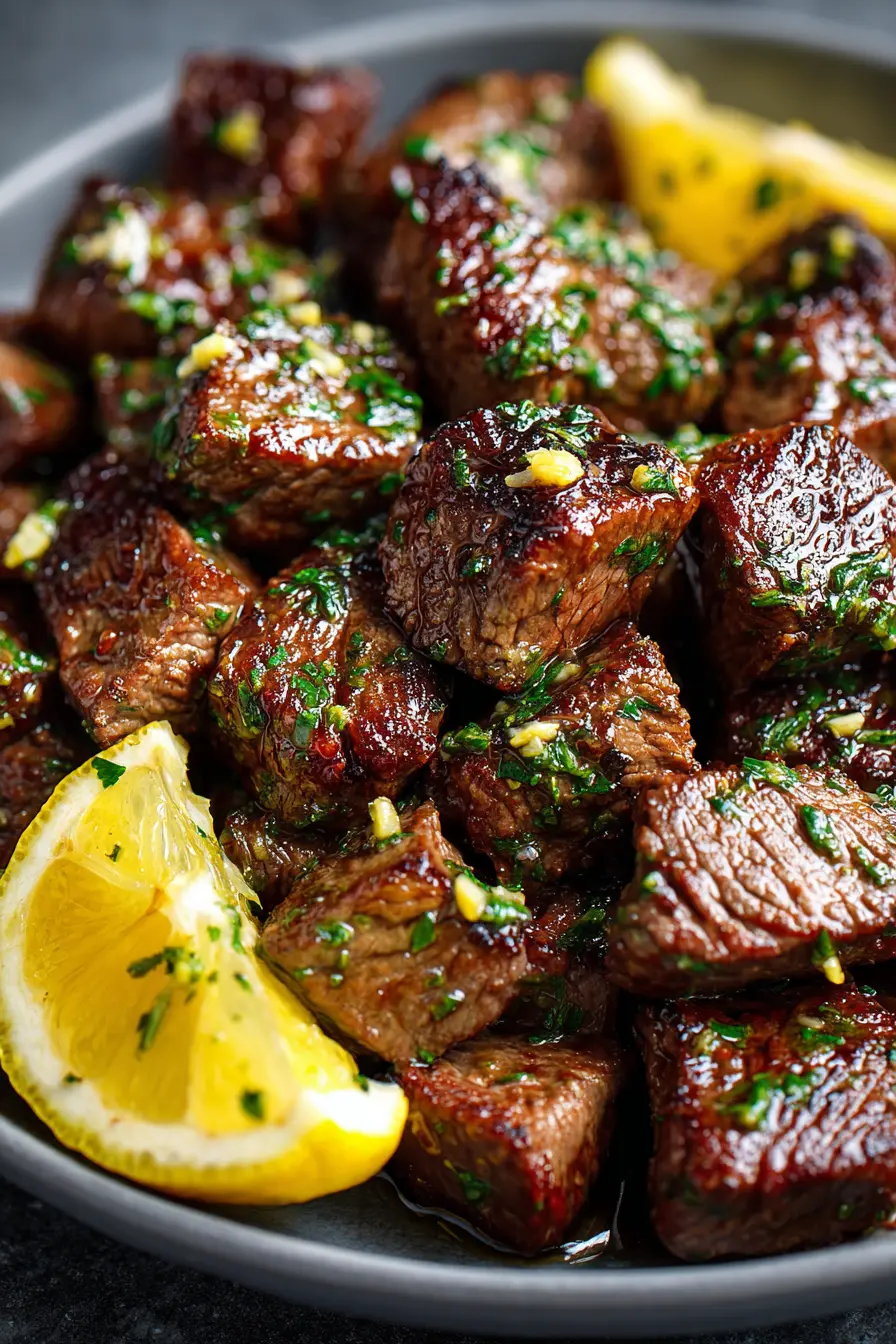
Garlic Butter Steak Bites are a fast, reliable way to get a rich, savory dinner on the table in under 30 minutes. You’ll get browned edges, a tender center, and a glossy garlic butter finish that clings to every bite. This version keeps things simple while still giving you that steakhouse-style flavor at home.
The method below works whether you use a skillet or the grill. It also gives you control over doneness, so your steak stays juicy instead of overcooked.
If you’ve ever struggled with dry steak or uneven cooking, this approach solves both problems. Smaller pieces cook quickly and evenly, while the garlic butter adds moisture and flavor right at the end.
In This Article
- Why this recipe works
- Ingredients with tips
- How to make Garlic Butter Steak Bites
- Pro tips and mistakes to avoid
- Variations and substitutions
- Storage and reheating
- Quick FAQ
Why Garlic Butter Steak Bites Work
Quick Sear, Big Flavor
Small steak cubes cook fast, which means you can get a solid sear without overcooking the inside. That contrast—crisp edges and juicy centers—is what makes Garlic Butter Steak Bites so satisfying.
The smaller size also increases surface area, which means more browning and more flavor in less time. You’re essentially maximizing the best part of steak—the crust.
Garlic Butter Coating That Actually Sticks
Finishing with butter and garlic at the end keeps the flavor fresh and prevents burning. The butter melts into the pan juices, coating each piece evenly instead of sliding off.
Adding a small splash of soy sauce or broth helps emulsify the butter slightly, creating a light sauce that clings better instead of pooling at the bottom of the pan.
Flexible Cooking Method
A cast iron skillet gives you the best crust, but a grill works too. If you’ve tried quick stovetop meals like this 30 Minute Chicken Parmesan Pasta Recipe, you’ll appreciate how much control you have over heat.
You can also adapt this recipe for indoor griddles or even an air fryer for a lighter version, though the skillet still delivers the richest flavor.
Balanced Fat and Heat
Using a mix of oil for searing and butter for finishing prevents burning while still delivering flavor. High heat builds the crust, and lower heat at the end protects the garlic and butter from turning bitter.
Key Ingredients
Steak
- Sirloin (1.5 lbs) – Lean, affordable, and cooks evenly.
- Ribeye – More flavor from fat, but trim excess to avoid greasy bites.
- Tenderloin – Extremely tender, but milder in flavor and more expensive.
Whichever cut you choose, look for good marbling and avoid overly thin cuts. Thickness helps keep the interior juicy during high-heat cooking.
If your steak has a thick fat cap, trim most of it off. Too much fat can render quickly and interfere with browning.
Garlic Butter
- Butter (2–3 tbsp) – Adds richness and helps the sauce cling.
- Garlic (4 cloves, minced) – Fresh garlic gives the best flavor.
- Soy sauce (1–2 tsp) – Deepens the savory flavor without making it salty.
For extra depth, you can use a mix of butter and a small amount of olive oil. This raises the smoke point slightly and prevents the butter from browning too quickly.
A small squeeze of lemon at the end can balance the richness without making the dish taste acidic.
Optional Sweet-Savory Glaze
If you like a slightly sticky finish, you can add a touch of honey and BBQ sauce. It leans closer to a glaze while still working with the garlic butter base. This honey garlic sauce shows the same balance.
Keep the glaze light—too much can overpower the steak and make the bites overly sweet.
Helpful Prep Note
Cut steak into even 1-inch cubes and pat them dry. Dry surfaces brown better, which is key for proper Garlic Butter Steak Bites.
If you have time, let the salted steak sit uncovered in the fridge for 30–60 minutes before cooking. This dry-brining step improves both flavor and browning.
How to Make Garlic Butter Steak Bites
1. Prep the Steak
Cut into evenly sized cubes and season with salt and pepper. Let the meat sit at room temperature for 10–15 minutes so it cooks evenly.
Avoid overcrowding your cutting board—spacing pieces out helps you see fat lines and trim excess more easily.
2. Sear in a Hot Pan
Heat a skillet over medium-high with a little oil. Add steak in a single layer. Don’t crowd the pan—work in batches if needed. Sear for 2–3 minutes per side until browned.
Resist the urge to stir constantly. Letting the steak sit undisturbed is what creates that deep, golden crust.
If the pan looks dry, add a small splash of oil between batches to maintain even browning.
3. Add Garlic Butter
Lower the heat slightly, then add butter and garlic. Stir quickly so the garlic softens without burning. The butter should foam and smell nutty.
You can tilt the pan and spoon the butter over the steak for extra flavor, similar to classic steak basting techniques.
4. Finish and Serve
Toss everything together for 1–2 minutes. Remove from heat once the steak reaches your preferred doneness (130–140°F for medium-rare to medium).
Finish with a pinch of flaky salt or a squeeze of lemon juice to brighten the flavors just before serving.
If you want extra sauce, add a tablespoon of broth at the end and scrape up browned bits from the pan.
Optional Glaze Finish
If using a glaze, add it at the very end and toss briefly until it thickens and coats the steak.
Keep the heat moderate during this step to prevent sugars from burning.
Pan Sauce Upgrade
After removing the steak, you can quickly build a richer sauce in the same pan. Add a splash of broth, a knob of butter, and a pinch of garlic, then simmer for 1–2 minutes until slightly thickened. Pour it back over the steak bites for extra depth.
This step is optional but useful if serving with rice or potatoes that benefit from more sauce.
Expert Tips
Don’t Overcrowd the Pan
Crowding traps steam and prevents browning. Good Garlic Butter Steak Bites need direct contact with heat.
Watch the Garlic Closely
Garlic burns fast. Always add it after the steak is mostly cooked and the heat is slightly reduced.
Use High Heat First, Then Finish Low
This gives you a crust without overcooking the inside.
Let the Steak Rest Briefly
Give it 3–5 minutes before serving so juices redistribute.
Use the Right Pan
Cast iron holds heat best and gives the most consistent sear. Stainless steel also works well, but nonstick pans won’t develop the same crust.
Cut Against the Grain
If your steak cut has visible grain, slice cubes across it. This shortens muscle fibers and makes each bite more tender.
Control Doneness
Because the pieces are small, they can go from perfect to overcooked quickly. Pull them off heat slightly earlier than you think—they’ll continue cooking from residual heat.
Troubleshooting Texture
If your steak turns out chewy, it was likely overcooked or cut with the grain. If it’s pale instead of browned, the pan wasn’t hot enough or the meat was too wet.
Choose the Right Oil
Use a neutral, high smoke point oil like avocado or canola for searing. Olive oil can work, but it may smoke sooner at high temperatures.
Batch Cooking Strategy
If doubling the recipe, cook in batches and keep finished steak loosely covered. Combine everything at the end with the garlic butter so all pieces stay evenly coated.
Serving Ideas
Serve over mashed potatoes, rice, or with crusty bread to soak up the garlic butter. For contrast, pair with something fresh like 30 Minute Fresh Corn Tomato Salsa Recipe or Watermelon Feta Bites With Mint Lime Drizzle.
They also work well in wraps, over salads, or tucked into warm pita with a simple yogurt sauce.
Variations
Add Herbs
Fresh parsley or thyme brightens the richness right at the end.
Rosemary works too, but use it sparingly since it can overpower the garlic butter.
Make It Spicy
Add red pepper flakes or a spoon of chili paste for heat.
A drizzle of hot honey also adds both sweetness and spice without complicating the recipe.
Use Chicken Instead
You can follow the same method with chicken, cooking until it reaches 165°F.
Chicken thighs work best because they stay juicy under high heat.
Skewer and Grill
Thread onto skewers and grill over medium heat, turning often for even browning.
Brush with garlic butter during the last minute of grilling for the best flavor.
Add Vegetables
Mushrooms, zucchini, or bell peppers can cook in the same pan. Add them after the steak is seared so they don’t release moisture too early.
If you like grilled flavors, try this 7 Year Perfected Grilled Shrimp Tacos With Pineapple Salsa for another quick option.
Flavor Boosters
A small splash of Worcestershire sauce or a pinch of smoked paprika can deepen the savory profile without changing the core recipe.
Grated parmesan added right at the end creates a slightly salty, nutty finish that pairs well with the butter.
Storage and Reheating
Store leftover Garlic Butter Steak Bites in an airtight container in the fridge for up to 3 days.
For best results, store the steak and any extra sauce together so it stays moist.
Reheat gently in a skillet over medium-low heat. Add a splash of water or broth to loosen the sauce. Avoid high heat, which can overcook the steak.
You can also reheat in short microwave bursts, but cover the dish to prevent drying out.
If repurposing leftovers, slice thinner and add to sandwiches, rice bowls, or omelets for a quick second meal.
Freezing isn’t ideal, as the texture can become tough when reheated.
FAQ
What’s the best cut for Garlic Butter Steak Bites?
Sirloin is the most reliable. Ribeye adds more flavor, while tenderloin is softer but milder.
Can I make Garlic Butter Steak Bites ahead of time?
You can prep and cut the steak ahead, but cook it fresh for the best texture and flavor.
Why are my steak bites tough?
They were likely overcooked or cut too small. Use larger cubes and cook quickly over high heat.
Can I marinate the steak?
Yes, but keep it simple and short—30 minutes is enough. Too much liquid can prevent proper browning.
Do I need a thermometer?
It helps, but isn’t required. Look for a browned crust and slight springiness for medium doneness.
Helpful References:
Conclusion
Garlic Butter Steak Bites are one of those go-to meals that deliver every time—quick to cook, easy to adjust, and full of flavor. Once you get the timing down, you can make them your own with different cuts, seasonings, or sides.
They’re especially useful on busy nights when you still want something satisfying without a long prep or cook time.
Give them a try this week and pair them with your favorite simple sides—you’ll likely come back to this recipe often.
Related Recipes
If you liked these Garlic Butter Steak Bites, round out your table with something fresh, creamy, and a little sweet. A drizzle of Creamy Cilantro Lime Dressing 5 Minute Recipe over grilled veggies pairs beautifully, and something cool like 20 Minute No Bake Key Lime Cheesecake Bars balances the richness at the end of the meal.
Want to keep the grill going? Add a side of skewers inspired by this Honey Garlic BBQ Chicken Skewers Recipe for a slightly different take on the same sweet-garlic base.
PrintGarlic Butter Steak Bites: Quick Recipe
- Prep Time: 10
- Cook Time: 30
- Total Time: 40
- Yield: 4 servings 1x
- Category: Main Course
- Method: Grilling, Mixing
- Cuisine: American
Description
These juicy garlic butter-style chicken skewers are coated in a sweet and savory honey BBQ glaze, then grilled to perfection. Each bite is tender, slightly smoky, and packed with bold flavor from garlic and a hint of tang. This easy recipe is perfect for weeknight grilling or casual gatherings, and pairs well with simple sides or dishes like 30 Minute Chicken Parmesan Pasta Recipe.
Ingredients
- 1.5 lbs boneless, skinless chicken breasts, cut into 1-inch cubes
- 1/2 cup honey
- 4 cloves garlic, minced
- 1/2 cup BBQ sauce
- 2 tablespoons low sodium soy sauce
- 1 tablespoon apple cider vinegar
- 1/4 teaspoon red pepper flakes (optional)
- Wooden skewers
Instructions
- Soak wooden skewers in water for at least 30 minutes to prevent burning during grilling.
- In a medium bowl, whisk together honey, minced garlic, BBQ sauce, soy sauce, apple cider vinegar, and red pepper flakes until smooth and well combined.
- Add the chicken cubes to the marinade and toss until evenly coated. Let marinate for at least 15 minutes, or refrigerate up to 1 hour for deeper flavor.
- Preheat the grill to medium heat, about 350–400°F, ensuring grates are clean and lightly oiled.
- Thread the marinated chicken pieces onto the soaked skewers, leaving slight space between pieces for even cooking.
- Place skewers on the grill and cook for 6–8 minutes per side, turning occasionally, until the chicken is fully cooked and reaches an internal temperature of 165°F.
- Watch for slight charring and caramelization on the edges while ensuring the centers remain juicy.
- Remove from the grill and let rest briefly before serving warm.
Notes
- Marinating longer enhances flavor but avoid exceeding 2 hours to prevent texture changes.
- If grilling indoors, a grill pan can be used over medium-high heat.
- Brush extra sauce on during the last few minutes for a thicker glaze.
- Serve with rice, salad, or grilled vegetables for a complete meal.
Nutrition
- Array