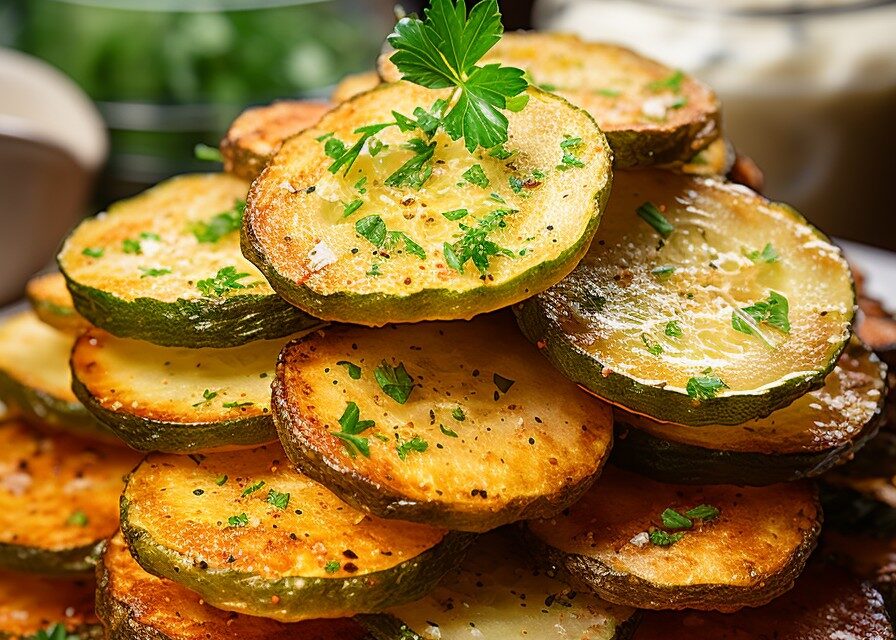
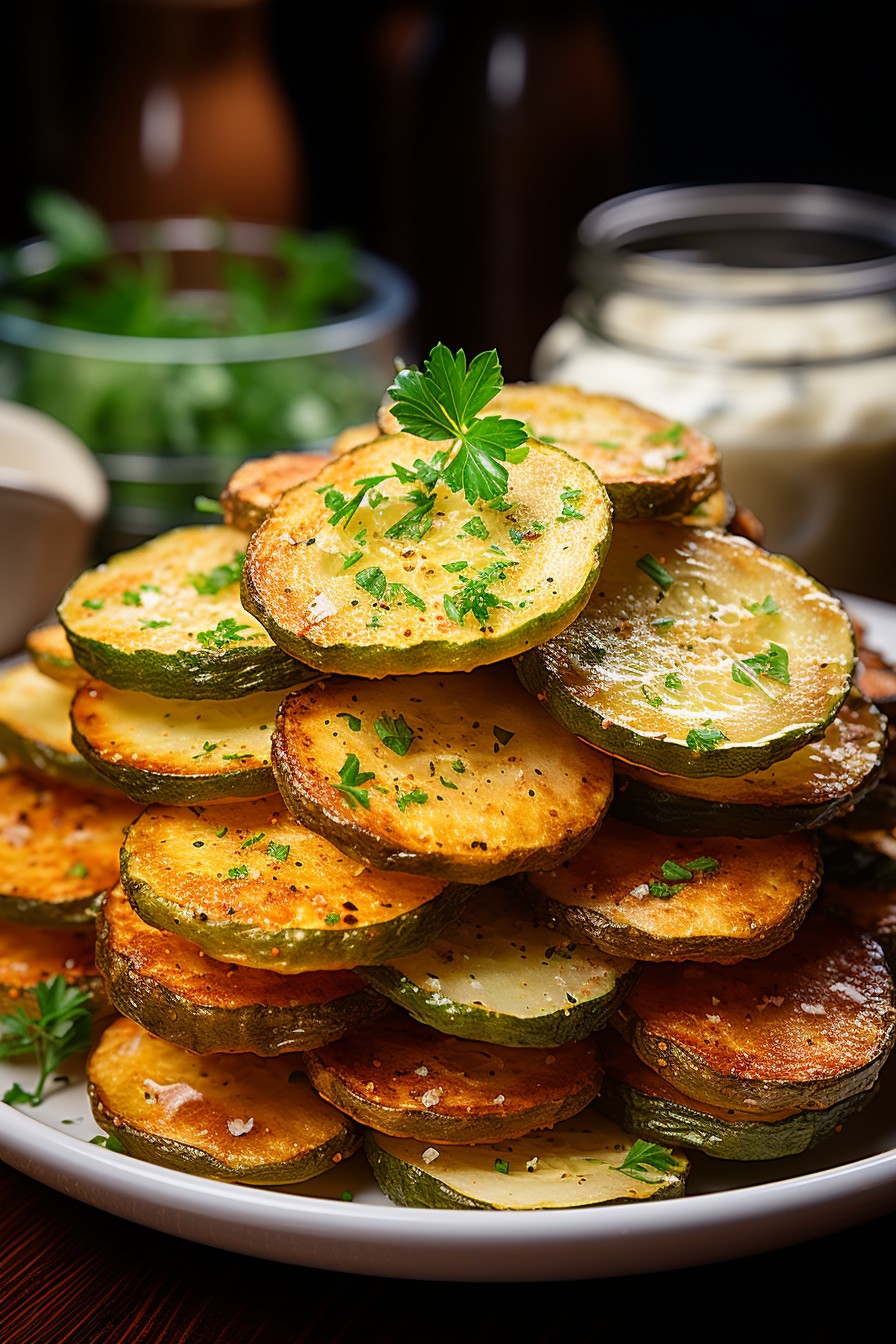
My Secret to Perfectly Crispy Fried Pickles
The secret to truly great fried pickles comes down to moisture control. Many recipes skip this step, but I learned the hard way that soggy pickles are no fun. The key is to get those pickle slices as dry as humanly possible before they even think about hitting the flour. Patting them dry doesn’t just help the breading stick; it ensures a shatteringly crisp crust. I used to dread making these, but not anymore. The reward is well worth the effort. Now, let’s get to the recipe!
Why You’ll Love This Fried Pickles Recipe
- These are dangerously delicious and satisfying. The salty, tangy interior against the crunchy exterior makes a perfect bite.
- I love that you can customize your seasoning blend for endless flavor possibilities.
- Want to wow your friends? Serve this at your next game day gathering.
- This is secretly quick and easy. Once you get the breading process down, it comes together in minutes.
What You’ll Need
Dill Pickle Slices
Reach for good quality dill pickle slices. I prefer thicker-cut slices. They hold up better during the frying process and give you more to bite into. Avoid the sweet pickle varieties here, or else you will not get the same satisfying tang.
When selecting your pickles, consider the brine. A brine with a good balance of dill, garlic, and spices will impart even more flavor to your fried pickles. Claussen Kosher Dill Pickle Spears, while needing to be sliced, are a great go-to brand.
All-Purpose Flour
All-purpose flour forms the base of our breading, giving the eggs and panko something to grip. Be sure to shake off the excess, though — too much flour can create a gummy coating.
For an even lighter coating, you can use cake flour. But all-purpose is perfect for yielding that classic fried texture we all know and love.
Cornstarch
This is my secret weapon for extra-crispy fried pickles. A touch of cornstarch in the flour mixture helps create a lighter, more delicate crust that stays crunchy even as the pickles cool slightly.
Don’t skip the cornstarch! Seriously, it’s essential for achieving that restaurant-worthy crunch. It prevents gluten development, which contributes to a less-crisp result.
Spices
Salt, Garlic powder, paprika, cayenne pepper
This is where you can really get creative! I like a blend of garlic powder, smoked paprika (it adds a wonderful depth), and a pinch of cayenne for a little kick. Don’t be afraid to experiment with other spices you love, like onion powder, chili powder, or even a touch of dried dill. I reach for the McCormick smoked paprika every time.
For a smoky flavor, use smoked salt in addition to smoked paprika. Or, for a spicy kick, add a generous pinch of chili flakes to the flour mixture. Consider adding dry mustard for a tangy edge.
Eggs
The eggs act as a binder, helping the breading adhere to the pickle slices. Make sure to whisk them well with the buttermilk for even coating.
Crack the eggs into a separate bowl first, before adding them to the buttermilk. This allows you to check for shells and ensures they are thoroughly mixed. This contributes to an even, consistent coating.
Buttermilk
Buttermilk lends the pickles a slight tang that complements the dill flavor perfectly. It also helps tenderize them slightly, creating a more pleasant texture. If you don’t have buttermilk on hand, you can make a quick substitute by adding a tablespoon of lemon juice or white vinegar to regular milk. Let it sit for a few minutes to curdle slightly before using.
The acidity in buttermilk acts as a tenderizer, ensuring your fried pickles aren’t too tough. Try experimenting with different ratios of lemon juice or vinegar to milk to find your perfect buttermilk substitute.
Panko Breadcrumbs
Panko breadcrumbs are the key to that ultra-crispy outer shell. Their light, airy texture creates a much crunchier coating than regular breadcrumbs.
Pulse the panko breadcrumbs in a food processor for a finer coating, if desired. You can also toast them lightly in a dry skillet for a richer flavor and even more crunch. Be careful not to burn them!
Oil
Canola or vegetable oil works best for frying thanks to their high smoke point. This means they can withstand high temperatures without breaking down or imparting a bad flavor to the pickles. Peanut oil also works.
Maintain a consistent oil temperature throughout the frying process. Use a deep-fry thermometer to monitor the temperature and adjust the heat as needed. If the oil is too cool, the pickles will absorb too much oil and become greasy. If it’s too hot, they’ll burn on the outside before they’re cooked through.

How to Make Fried Pickles
Prep the Pickles
- Drain your dill pickle slices thoroughly in a colander. No one likes soggy pickles.
- Lay the pickle slices on a paper towel-lined plate. Pat them *completely* dry with more paper towels. This is crucial for achieving a crispy coating.
Don’t underestimate the importance of drying the pickles. You may need to use several layers of paper towels to absorb all the excess moisture. A little patience here pays off big time in terms of crispiness.
Consider placing the pickles between two layers of paper towels and pressing down gently to extract even more moisture. You can also let them air dry on a wire rack for about 30 minutes after patting them dry.
Prepare the Breading Station
- In a shallow dish, whisk together the flour, cornstarch, salt, garlic powder, paprika, and cayenne pepper.
- In a separate shallow dish, whisk together the eggs and buttermilk.
- In a third shallow dish, place the panko breadcrumbs.
Setting up a proper breading station is essential for efficient and mess-free frying. Make sure each dish is wide enough to easily accommodate the pickle slices. I like to arrange my breading station in a linear fashion, from flour to egg to panko, for maximum efficiency.
Use your left hand for dry ingredients and your right hand for wet ingredients to prevent clumping. This will keep your fingers clean and your breading station tidy.
Breading and Frying the Pickles
Step 1:Dredge each pickle slice in the flour mixture, ensuring it’s fully coated. Shake off any excess flour. 2.
Step 2:Dip the floured pickle into the egg mixture, making sure it’s completely submerged. Allow excess egg to drip off. 3.
Step 3:Coat the pickle slice in the panko breadcrumbs, pressing gently to ensure the breadcrumbs adhere. Don’t be shy — really pack those breadcrumbs on! 4.
Step 4 Carefully place the breaded pickle slices into the hot oil, ensuring not to overcrowd the pan. Work in batches to maintain the oil temperature. I aim for 350°F (175°C). 5.
Step 5: Fry for 2-3 minutes per side, or until golden brown and crispy. Keep a close eye on them, as they can burn quickly. The oil should be hot enough that they sizzle immediately. 6.
Step 6: Remove the fried pickles from the oil and place them on a wire rack lined with paper towels to drain excess oil. This helps them stay crispy instead of getting soggy.
Use a slotted spoon or spider to carefully remove the fried pickles from the oil. This will allow the excess oil to drain off easily.
If you notice the oil temperature dropping significantly while frying, increase the heat slightly and wait for the temperature to recover before adding more pickles. This will ensure consistent cooking and crispy results.
Don’t discard the used oil immediately! Let it cool completely, then strain it through a fine-mesh sieve lined with cheesecloth to remove any food particles. Store the strained oil in an airtight container in a cool, dark place for future frying. You can reuse it a few times, but be sure to discard it if it starts to smell rancid or becomes discolored.

Making the Creamy Dip
A simple creamy dip elevates these fried pickles. Ranch dressing is an obvious choice, but don’t underestimate the power of a homemade aioli. To make a quick aioli, simply whisk together mayonnaise, minced garlic, lemon juice, and a pinch of salt and pepper. You can even add a dash of hot sauce for heat.
For a more complex aioli, try using roasted garlic instead of fresh. Roast a head of garlic in the oven until soft and caramelized, then squeeze out the cloves and mash them into a paste before adding them to the mayonnaise. This will give your aioli a sweeter, more mellow flavor.
Experiment with other dipping sauces as well. A honey-mustard sauce, a spicy remoulade, or even a simple ketchup will all complement the salty, tangy flavor of the fried pickles.
How to Serve It
Enjoy these fried pickles immediately. They’re best served hot and crispy with your favorite dipping sauce on the side. Ranch dressing, blue cheese dressing, or even a spicy sriracha mayo are all fantastic options. Thinking about sides? The
Quick Pickled Red Onions With Citrus Twist
would be a nice addition. These are delicious as a snack on their own, or alongside burgers and sandwiches. Be aware that they’ll lose their incredible crispness as they sit so eat them quickly!
Consider serving them with a side of crispy french fries or onion rings for a classic appetizer platter. Or, pair them with a refreshing coleslaw or a simple green salad for a lighter meal.
Garnish the fried pickles with a sprinkle of fresh dill or parsley for a pop of color and flavor.
Storage and Reheating
- Fridge: Store leftover fried pickles in an airtight container in the refrigerator for up to 2 days.
- Freezer: Freezing is not recommended. Because they will become very soggy when thawed.
- Reheating: For the best results, reheat fried pickles in a preheated oven at 350°F (175°C) for 5-7 minutes, or until heated through. An air fryer also works well for crisping them up.
To prevent the fried pickles from becoming soggy in the refrigerator, try placing a layer of paper towels in the bottom of the container to absorb any excess moisture.
If you’re reheating them in the oven, spread them out in a single layer on a baking sheet to ensure they crisp up evenly. You can also drizzle them with a little bit of oil before reheating to help them regain their crispness.
Avoid reheating them in the microwave, as this will make them even soggier.
FAQ
Can I use an air fryer to cook these?
Absolutely! Preheat your air fryer to 400°F (200°C). Place the breaded pickles in a single layer in the air fryer basket and cook for 8-10 minutes, flipping halfway through, until golden brown and crispy.
How do I keep my fried pickles from getting soggy?
The key is to ensure the pickles are completely dry and the oil is hot enough. Don’t overcrowd the pan, and drain the fried pickles on a wire rack. The rack lets air circulate.
Can I add other spices to the breading?
Definitely! Feel free to experiment with different spices to customize the flavor to your liking. Onion powder, chili powder, or even a touch of cumin would all be delicious additions.
What kind of pickles work best?
Dill pickles are the gold standard. Their tangy, sour flavor contrasts beautifully with the savory breading and creamy dip. Avoid sweet pickles, as they won’t provide the same satisfying flavor.
Can I use pickle spears instead of slices?
Yes, you can! Just be sure to adjust the frying time accordingly. Pickle spears will take a bit longer to cook through than slices. You may want to cut the pickle spears in half lengthwise for easier handling.
What’s the best oil temperature for frying?
The ideal oil temperature for frying fried pickles is 350°F (175°C). Use a deep-fry thermometer to monitor the temperature and adjust the heat as needed. Maintaining a consistent temperature is crucial for achieving crispy, golden-brown results.
Related Recipes
Watermelon Feta Bites With Mint Lime Drizzle
7 Year Perfected Grilled Shrimp Tacos With Pineapple Salsa
Fried Pickles recipe
- Prep Time: 10
- Cook Time: 30
- Total Time: 40
- Yield: 4 servings 1x
- Category: Appetizer
- Method: Stovetop, Frying
- Diet: Vegetarian
Description
Craving a snack that’s salty, tangy, and utterly addictive? This Fried Pickles recipe is the answer. With a crispy, golden coating and a burst of dill pickle flavor, they’re the perfect appetizer or late-night treat. The secret is to get those pickle slices as dry as possible before breading them. For a great main course to pair with your fried pickles, see this tasty Hawaiian Bbq Pulled Pork recipe.
Ingredients
- 1 cup dill pickle slices (thick-cut preferred)
- 1 cup all-purpose flour
- 1/4 cup cornstarch
- 1 teaspoon salt
- 1 teaspoon garlic powder
- 1/2 teaspoon paprika (smoked is great)
- 1/4 teaspoon cayenne pepper (optional)
- 2 large eggs
- 1/2 cup panko bread crumbs
- Vegetable oil, for frying
Instructions
- Prepare Pickles: Drain the pickle slices well and pat them thoroughly dry with paper towels. This is crucial for crispy fried pickles.
- Make Flour Mixture: In a shallow dish, whisk together the flour, cornstarch, salt, garlic powder, paprika, and cayenne pepper (if using).
- Prepare Egg Wash: In another shallow dish, whisk the eggs until well combined.
- Prepare Bread Crumbs: In a third shallow dish, place the panko bread crumbs.
- Bread Pickles: Dredge each pickle slice in the flour mixture, then dip it in the egg wash, and finally coat it evenly with the panko bread crumbs. Press gently to help the bread crumbs adhere.
- Heat Oil: Pour about 1 inch of vegetable oil into a large skillet or pot and heat over medium-high heat until it reaches 350°F (175°C). Use a thermometer to ensure accuracy.
- Fry Pickles: Carefully add the breaded pickle slices to the hot oil in a single layer, being careful not to overcrowd the pan.
- Cook:Fry for 2-3 minutes per side, or until golden brown and crispy. Adjust heat to maintain temperature.
- Drain: Remove the fried pickles with a slotted spoon and transfer them to a wire rack lined with paper towels to drain excess oil.
- Cool Slightly: Let the fried pickles cool for a minute or two before serving.
- Serve: Serve immediately with your favorite dipping sauce, such as ranch dressing, blue cheese dressing, or spicy mayo.
Notes
- Substitutions: Use gluten-free flour and breadcrumbs for a gluten-free version. Substitute pickle spears for slices, but adjust frying time accordingly.
- Make Ahead: Bread the pickles up to 2 hours in advance and store them covered in the refrigerator before frying.
- Storage: Store leftover fried pickles in an airtight container in the refrigerator for up to 2 days. They will lose some crispness.
- Reheating: Reheat in a 350°F (175°C) air fryer for 3-5 minutes, or until heated through and crispy. You can also reheat them in a preheated oven for 5-7 minutes.
- Serving suggestions: Serve as an appetizer with dipping sauces, as a side with burgers or sandwiches, or as a topping for salads.
- Spice variations: Add onion powder, chili powder, or dried dill to the flour mixture for different flavor profiles.
- Dipping Sauce: Homemade ranch or spicy mayo complements the pickles wonderfully.
Nutrition
- Array