Okay, let’s talk about comfort food, shall we? There’s just something about a dessert that brings you right back to simpler times, isn’t there? And for me, nothing does that quite like a good, old-fashioned **Banana Pudding**. It’s the kind of treat that feels like a warm hug in a bowl – creamy, sweet, and just utterly delightful. It’s been a go-to in my kitchen for as long as I can remember, perfect for everything from weeknight treats to big family potlucks.
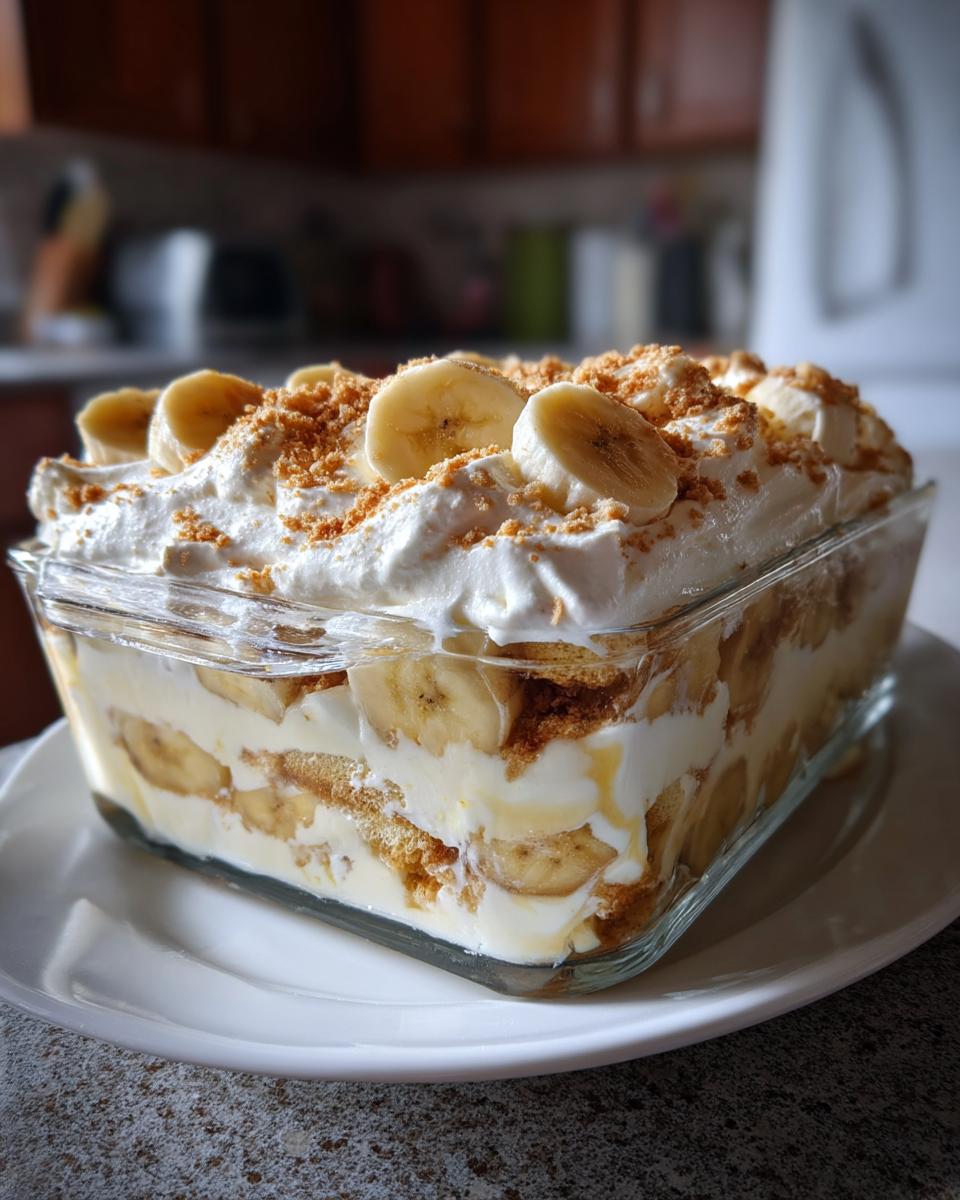
Honestly, I’ve whipped up countless batches of this stuff over the years. It’s one of those recipes that’s so forgiving and comes together so easily, you almost feel like you’re cheating! This particular **Banana Pudding** recipe is a total winner because it skips the baking altogether, making it super quick and perfect for those sudden dessert cravings (or when you just don’t want to turn on the oven!). Trust me, if you’re looking for a classic, no-fuss dessert that everyone will adore, this is it. Let’s dive in!
Why You’ll Love This Banana Pudding
Honestly, this isn’t just *any* banana pudding recipe; it’s the one you’ll keep coming back to! Here’s why I think you’ll fall head over heels for it:
- It’s ridiculously easy! Seriously, if you can whisk and layer, you can make this. No fancy techniques or tricky steps involved.
- No baking required! Perfect for those hot summer days or when you just don’t feel like turning on the oven. It comes together so fast.
- Pure, classic comfort. This tastes exactly like the banana pudding you remember from childhood – creamy, sweet, and full of those lovely vanilla wafer and banana layers.
- It’s a total crowd-pleaser. I’ve never met anyone who didn’t love a scoop (or two!) of this. It disappears fast at parties and gatherings!
It’s simple, it’s delicious, and it brings a smile to everyone’s face. What’s not to love?
Ingredients for Classic Banana Pudding
Alright, let’s gather up what we need for this divine dessert! The beauty of this classic banana pudding is that it uses really simple stuff you probably already have or can easily grab at the store. No weird, hard-to-find ingredients here, thank goodness!
Here’s the lineup:
- 1 (5.1 ounce) package instant vanilla pudding mix: Make sure it’s INSTANT! That’s the key to the no-bake magic.
- 3 cups cold milk: Whole milk works beautifully for extra richness, but whatever you’ve got in the fridge will likely do the trick. Just make sure it’s nice and cold.
- 1 (12 ounce) container frozen whipped topping, thawed: Like Cool Whip! Thaw it in the fridge overnight or on the counter for a bit until it’s soft but still cold.
- 1 (11 ounce) box vanilla wafers: Nilla Wafers are the classic choice, of course! They get wonderfully soft in the pudding.
- 4 to 5 ripe bananas, sliced: You want them ripe, but not *too* ripe – just spotty, not completely brown. This gives them sweetness and makes them easy to slice.
See? Simple, right? Now we’re ready to get mixing!
Equipment for Making Banana Pudding
Good news! You don’t need a ton of fancy gadgets for this banana pudding. Just a few basic kitchen essentials will get the job done. Here’s what I usually grab before I start:
- A large mixing bowl: You’ll need space to whisk up that pudding mixture.
- A whisk: For getting that pudding nice and smooth, no lumps allowed!
- Measuring cups: Gotta measure that milk just right.
- A 9×13 inch dish: This is the perfect size for layering up all that goodness. A glass one is great so you can see the layers!
That’s it! See? Super simple. Now, let’s get to the fun part!
How to Prepare Your Banana Pudding
Okay, let’s get this show on the road! Making this banana pudding is seriously a breeze, and I’m going to walk you through it step-by-step. Just follow along, and you’ll have a dish of creamy, dreamy goodness ready to chill in no time.
Preparing the Pudding Mixture for Banana Pudding
First things first, we need to make our pudding base. Grab your large mixing bowl and your whisk. Pour in the 3 cups of nice, cold milk. This is important – cold milk helps the instant pudding set up properly! Now, dump in the entire package of instant vanilla pudding mix. Whisk it really well for about two minutes, just until there are no dry bits left and it starts to thicken up a bit. It won’t be super thick yet, and that’s totally fine!
Next, gently fold in your thawed whipped topping. You want to be gentle here so you don’t deflate it too much. Use a spatula and scoop from the bottom up, turning the bowl as you go, until it’s all combined into a smooth, lovely, creamy mixture. Don’t overmix it! This is your glorious pudding base.
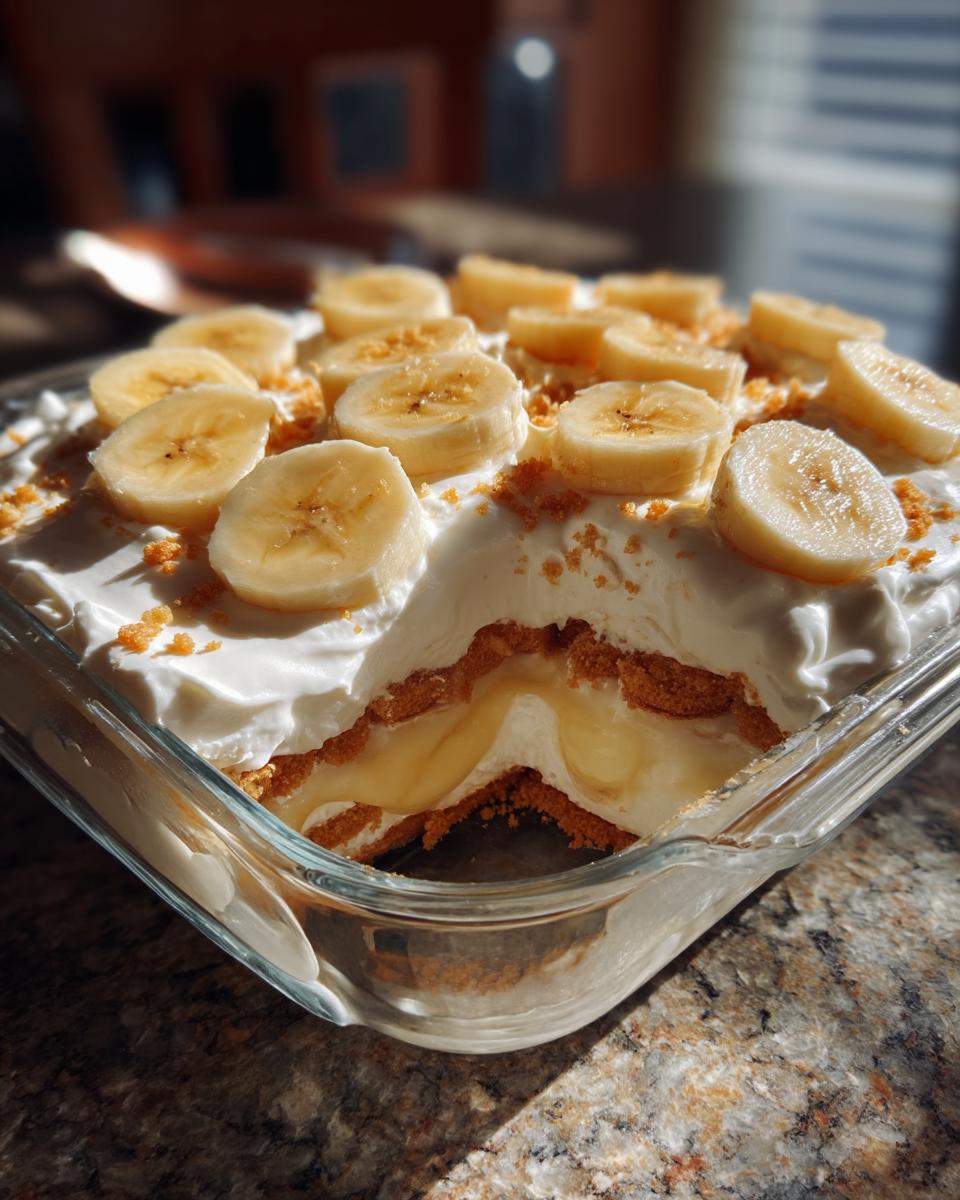
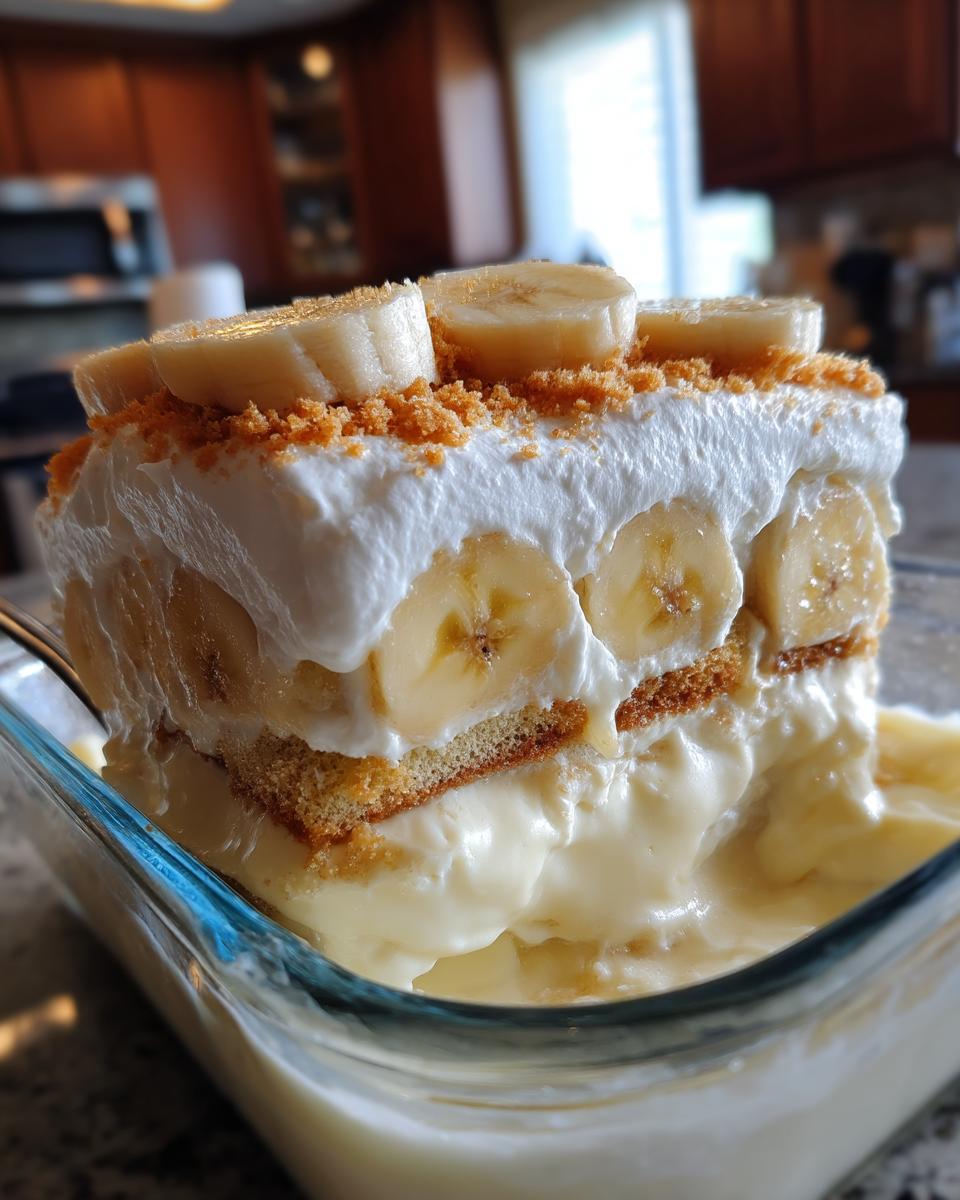
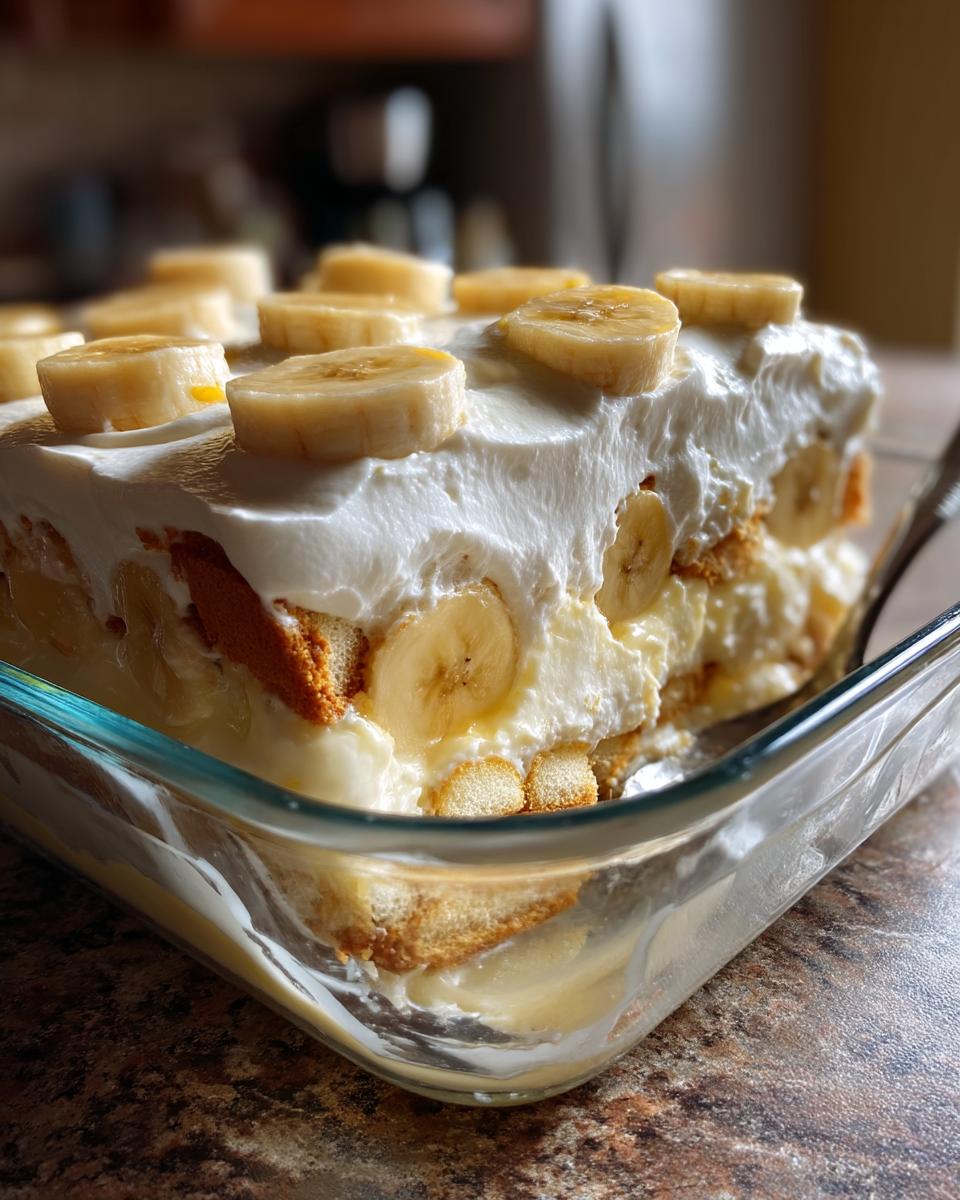
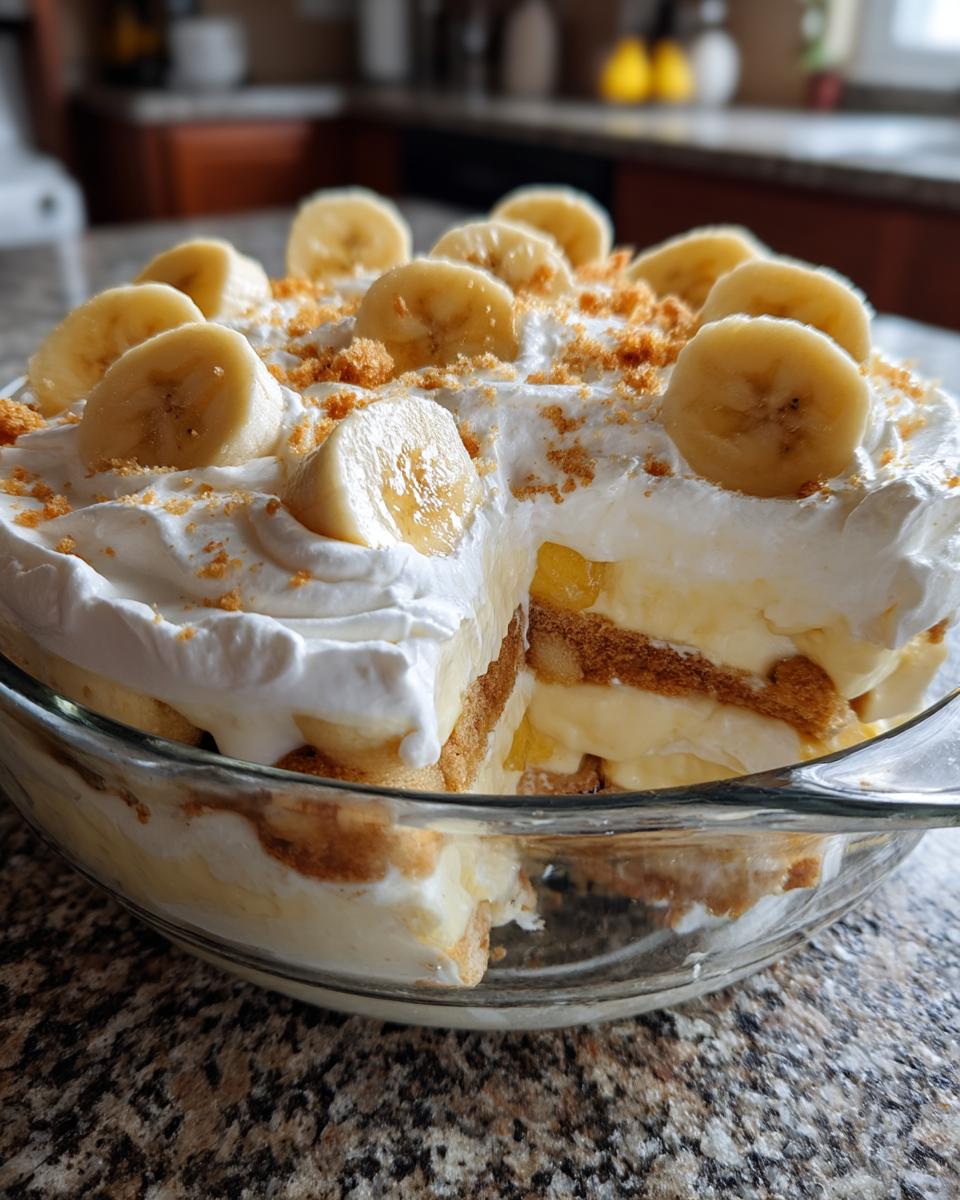
Layering Your Banana Pudding
Now for the fun part – layering! Get your 9×13 inch dish ready. We’re going to build this beauty layer by layer. Start with a single layer of vanilla wafers on the bottom. Just arrange them so they cover the base as much as possible. Don’t worry about perfect spacing, they’ll soften up anyway.
Next, add a layer of your sliced bananas right over the wafers. Use about half of your slices for this first layer. Then, spoon about half of your creamy pudding mixture evenly over the bananas. Spread it out gently with your spatula.
Repeat the layers: another layer of vanilla wafers, the rest of your sliced bananas, and finally, top it all off with the remaining pudding mixture, spreading it smooth on top.
Chilling Your Banana Pudding
Almost there! Once your layers are all set, cover the dish tightly with plastic wrap. This is a crucial step – that pudding needs time to firm up and for all those amazing flavors to meld together. Pop it in the fridge for at least 1 hour. Honestly, the longer it chills, the better it gets. Overnight is even better if you have the patience! The wafers will soften beautifully and the pudding will be perfectly set. Resist the urge to peek too much!
Tips for Perfect Banana Pudding
Making this banana pudding is pretty simple, but a few little things can take it from good to absolutely *amazing*. Trust me on these!
- Use Ripe, But Not Mushy, Bananas: You want bananas that have some nice brown spots – they’re sweeter and have more flavor. But don’t wait until they’re totally brown and soft, or they’ll turn mushy in the pudding. Just ripe enough to slice easily and taste sweet!
- Give it Plenty of Chill Time: This is probably the most important tip! That 1-hour minimum is okay if you’re in a rush, but letting it chill for several hours or even overnight makes a HUGE difference. The wafers soften up beautifully and all the flavors really hang out and become best friends. Patience is key here!
Follow those two little tips, and you’ll have banana pudding perfection!
Variations for Your Banana Pudding
While the classic banana pudding is pure magic, sometimes it’s fun to play around a little! Here are a few easy ways to switch things up if you’re feeling adventurous:
- Change the Pudding Flavor: Instead of vanilla, try instant banana cream pudding! Or even chocolate pudding for a fun twist.
- Add Other Fruits (Carefully!): Sliced strawberries or even some canned mandarin oranges (drained really well!) can add a different dimension. Just be mindful that some fruits release more liquid.
- Different Cookies: Swap the vanilla wafers for shortbread cookies, graham crackers, or even those little chessmen cookies! Each one gives a slightly different texture and flavor.
Don’t be afraid to experiment and find your own favorite version!
Frequently Asked Questions About Banana Pudding
Okay, so you’ve got questions about making this glorious banana pudding? Totally normal! Here are a few things folks often ask:
Can I use fresh bananas for Banana Pudding?
Absolutely, yes! In fact, you *should* use fresh bananas! The recipe specifically calls for “ripe bananas, sliced” for a reason. Using fresh, ripe bananas gives you the best flavor and texture. They sweeten up beautifully as they sit in the pudding. What you want to avoid are green, unripe bananas (they won’t be sweet enough) or bananas that are way past their prime and mushy (they’ll just disintegrate). Spotty is perfect!
How long does Banana Pudding last?
Properly stored in the fridge, this banana pudding is usually best within 2-3 days. The bananas can start to brown a bit after that, and the wafers get *very* soft. It’s still edible, but the texture changes. Keep it covered tightly with plastic wrap to keep it fresh!
Can I make Banana Pudding ahead of time?
Yes, you totally can! This is actually a great make-ahead dessert. You can assemble the whole dish up to a day in advance. Just make sure you give it that minimum chilling time (at least an hour, but longer is better!) before you plan to serve it. Making it ahead allows all those yummy banana pudding flavors to really soak into the wafers and meld together beautifully.
Estimated Nutritional Information for Banana Pudding
Okay, so while we’re mostly focused on deliciousness here, some folks like to know what they’re getting into nutritionally. Keep in mind that these are just *estimates* based on the ingredients listed, and things like the exact brand of pudding mix or whipped topping can make a difference. But it gives you a general idea!
Based on about 12 servings from a 9×13 inch dish, here’s a rough look at what you might find per serving:
- Calories: Around 350
- Total Fat: About 12g (with roughly 8g of that being saturated fat)
- Cholesterol: Maybe around 5mg
- Sodium: Roughly 200mg
- Total Carbohydrates: About 55g (including around 2g of fiber and 35g of sugar)
- Protein: Around 3g
Again, this is just a ballpark! If you’re tracking closely, you might want to calculate it based on the specific products you use. But hey, it’s dessert – sometimes you just gotta enjoy it!
Enjoy Your Homemade Banana Pudding
And there you have it! Your very own dish of classic, comforting banana pudding. Seriously, take a moment and admire those lovely layers before you dive in. Serve it up just like it is, or maybe with a little extra dollop of whipped cream on top if you’re feeling fancy. I really hope you give this recipe a try – it’s a guaranteed winner! If you make it, let me know how it turns out in the comments! I’d love to hear about your banana pudding adventure.
Print
Classic Banana Pudding 1 amazing result
- Total Time: 1 hour 15 minutes
- Yield: 12 servings 1x
- Diet: Vegetarian
Description
Classic banana pudding with vanilla wafers and sliced bananas layered in a dish.
Ingredients
- 1 (5.1 ounce) package instant vanilla pudding mix
- 3 cups cold milk
- 1 (12 ounce) container frozen whipped topping, thawed
- 1 (11 ounce) box vanilla wafers
- 4 to 5 ripe bananas, sliced
Instructions
- Prepare pudding mix according to package directions using 3 cups cold milk.
- Fold in whipped topping.
- In a 9×13 inch dish, layer vanilla wafers, sliced bananas, and pudding mixture. Repeat layers.
- Chill for at least 1 hour before serving.
Notes
- Use ripe bananas for the best flavor.
- Chill the pudding thoroughly to allow the flavors to meld.
- Prep Time: 15 minutes
- Cook Time: 0 minutes
- Category: Dessert
- Method: No Bake
- Cuisine: American
Nutrition
- Serving Size: 1 serving
- Calories: 350
- Sugar: 35g
- Sodium: 200mg
- Fat: 12g
- Saturated Fat: 8g
- Unsaturated Fat: 2g
- Trans Fat: 0g
- Carbohydrates: 55g
- Fiber: 2g
- Protein: 3g
- Cholesterol: 5mg