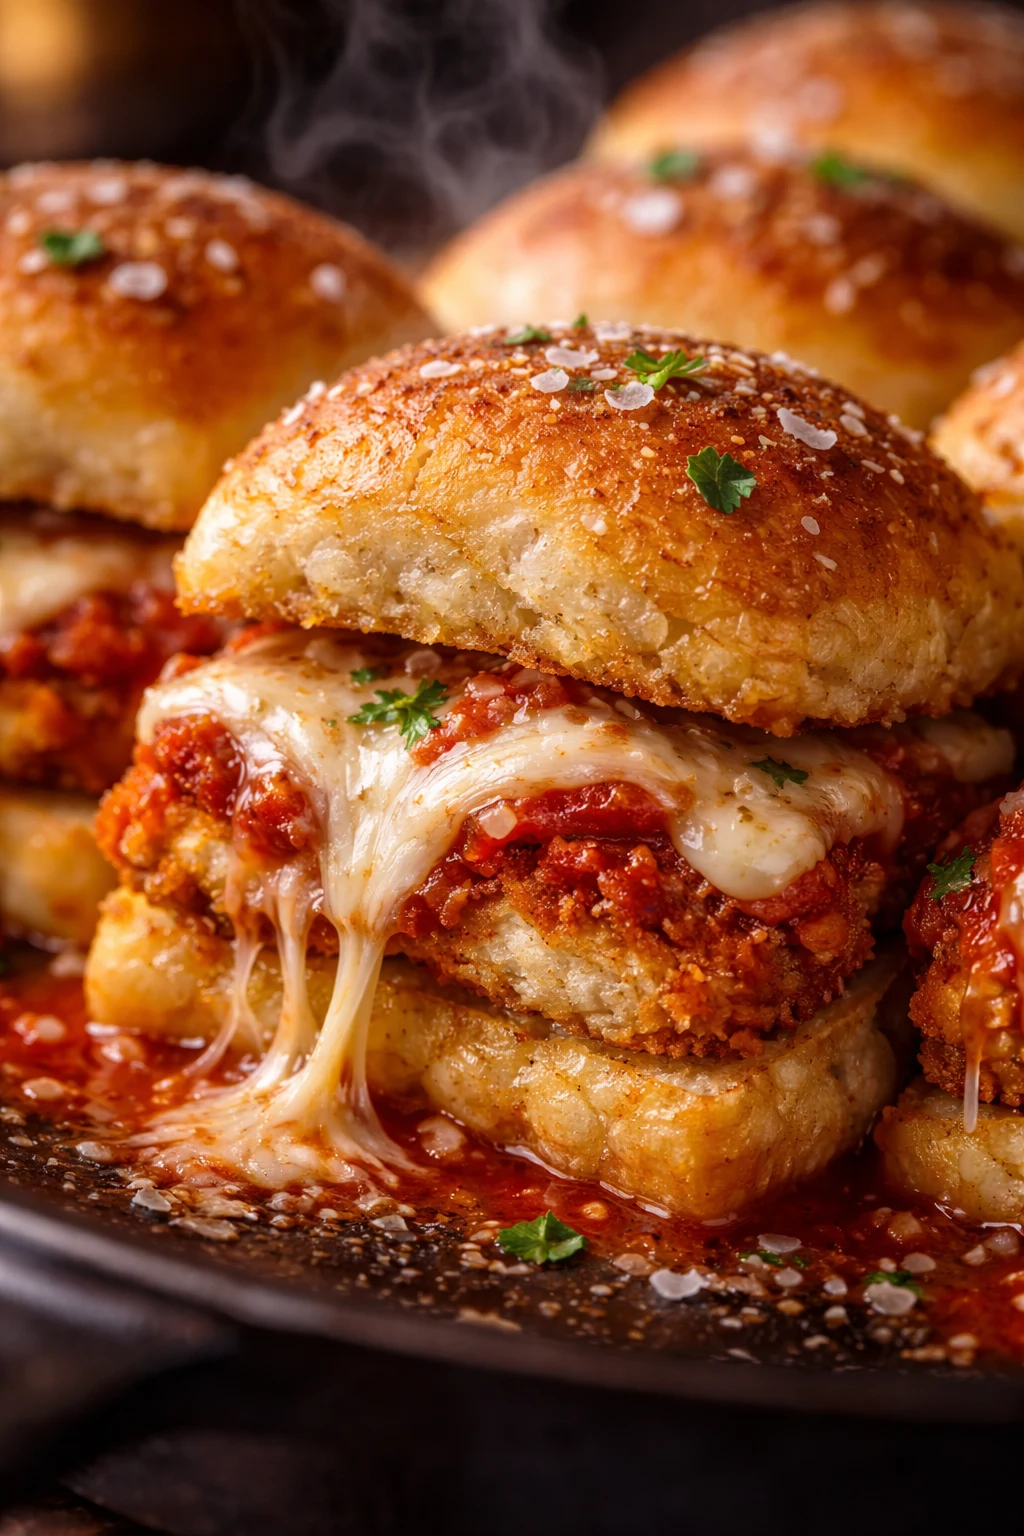
Chicken Parmesan Sliders Recipe: Easy & Cheesy Sliders
If there’s one recipe that changed my game for quick dinners and party apps, it’s this Chicken Parmesan Sliders recipe. Imagine sinking your teeth into tender chicken, smothered in rich marinara, and gooey mozzarella, all tucked into a buttery, garlicky toasted slider bun. This recipe is a hug in sandwich form, your new go-to for everything from a speedy weeknight meal to the ultimate game-day snack. These Easy Chicken Parmesan Sliders bring all the cozy, classic flavors of chicken parm into a convenient, bite-sized package!
In This Article:
- Why You’ll Love This Chicken Parmesan Sliders Recipe
- Ingredients for Chicken Parmesan Sliders
- How to Make Chicken Parmesan Sliders Step-by-Step
- Tips for the Best Chicken Parmesan Sliders
- Variations and Substitutions
- How to Store and Reheat
- Frequently Asked Questions
- More Easy Recipes to Try
Why You’ll Love This Chicken Parmesan Sliders Recipe
This Chicken Parmesan Sliders recipe is a true winner!
- Quick & Easy: Perfect for busy weeknights or last-minute gatherings, ready in under 30 minutes.
- Crowd-Pleaser: Guaranteed hit with kids and adults alike.
- Minimal Cleanup: One pan means less washing up.
- Budget-Friendly: Uses simple, accessible ingredients.
- Classic Flavors: All the deliciousness of chicken parmesan in a fun, handheld form.
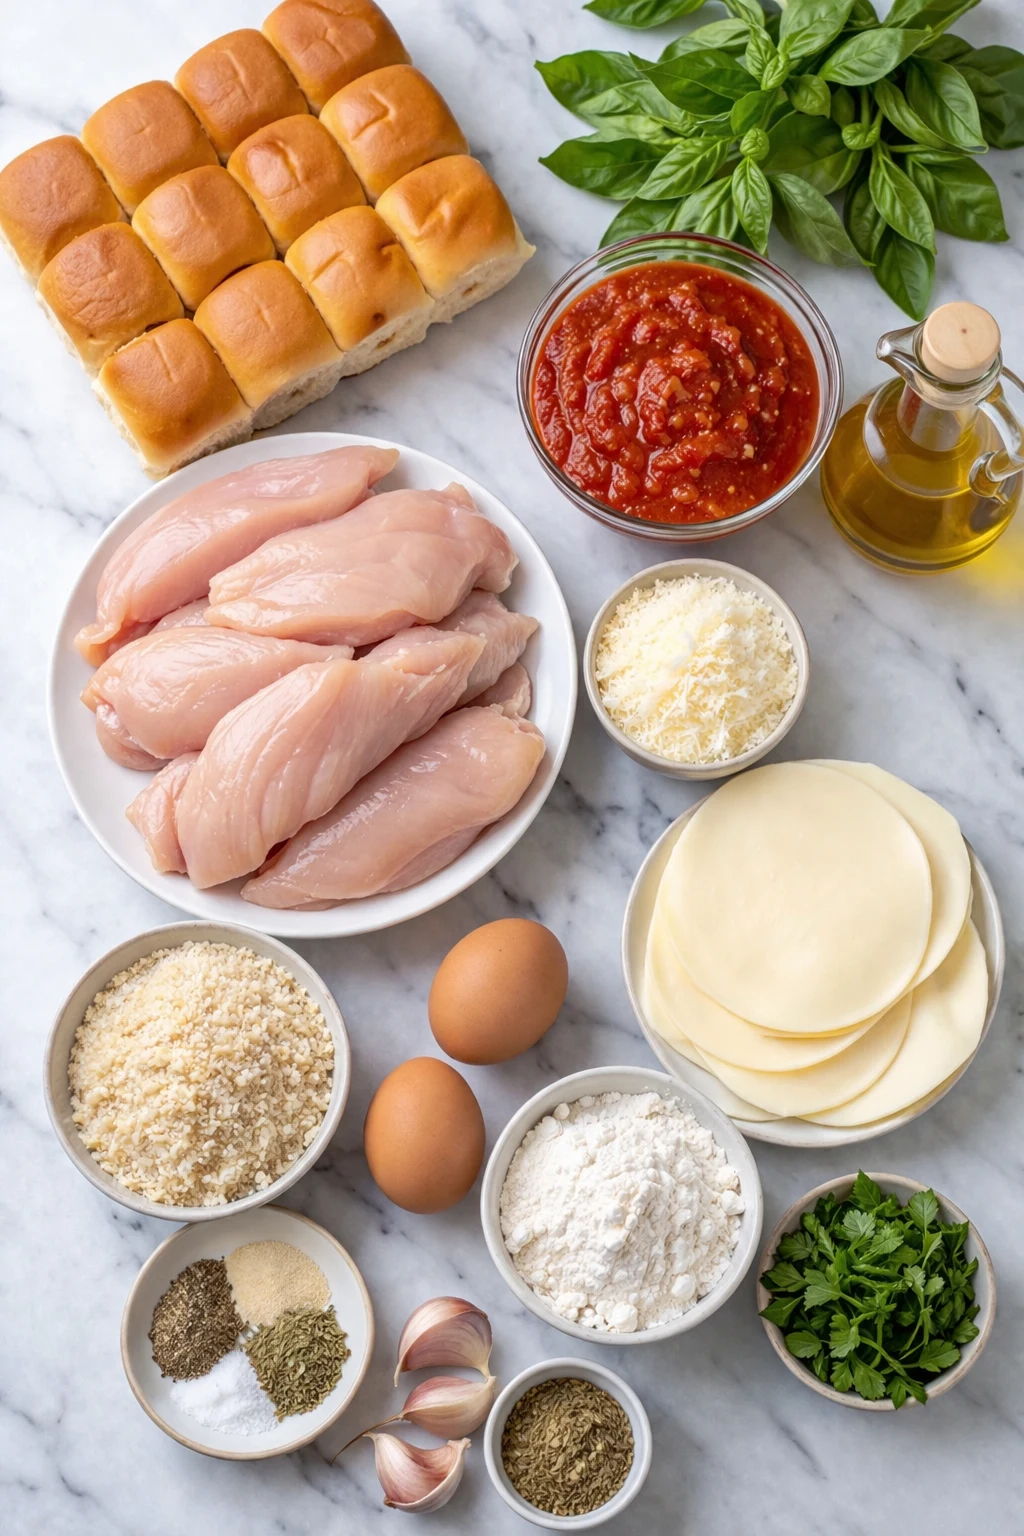
Ingredients for Chicken Parmesan Sliders
Here’s what you’ll need for this amazing Chicken Parmesan Sliders recipe.
- Slider Buns: One 12-pack Hawaiian sweet rolls or similar. Their slight sweetness balances savory chicken and tangy sauce, and they hold up well to the filling.
- Cooked Chicken: 2 cups shredded or diced. A rotisserie chicken is your best friend for quick assembly! Leftover cooked chicken breast or thighs also work. I often use leftovers from my savory lemon herb roasted chicken.
- Marinara Sauce: 1 cup, your favorite brand. Opt for good quality; it’s a key flavor component.
- Mozzarella Cheese: 1.5 cups shredded low-moisture, part-skim. Low-moisture mozzarella melts beautifully without making your sliders soggy.
- Parmesan Cheese: 1/4 cup grated, plus more for garnish. Freshly grated Parmesan offers superior flavor and melts better than pre-shredded.
- Butter: 3 tablespoons, melted. Salted butter adds a nice kick to the topping.
- Garlic Powder: 1/2 teaspoon.
- Italian Seasoning: 1/2 teaspoon.
- Fresh Parsley: 1 tablespoon, chopped (for garnish, optional). A sprinkle of fresh parsley brightens the dish.
How to Make Chicken Parmesan Sliders Step-by-Step
This Chicken Parmesan Sliders recipe is super easy, I promise.
Preparing Your Baking Dish
A 9×13 inch dish is usually perfect for a 12-pack of sliders.
- Preheat your oven to 375°F (190°C).
- Lightly grease your 9×13 inch baking dish to prevent sticking.
Assembling the Sliders
This is where the magic happens!
- Slice the Buns: Carefully slice the entire block of slider buns horizontally through the middle, keeping them connected to create a “top” and “bottom” slab. A serrated knife works best.
- Lay the Bottom Layer: Place the bottom half of the buns into your prepared baking dish.
- Spread the Sauce: Spoon about half of your marinara sauce evenly over the bottom buns.
- Add the Chicken: Evenly distribute the cooked shredded or diced chicken over the marinara.
- More Sauce: Drizzle the remaining marinara sauce over the chicken.
- Cheese Time! Sprinkle the mozzarella cheese evenly over the chicken and sauce, then follow with the grated Parmesan cheese.
- Top it Off: Place the top half of the slider buns back over the cheese layer.
The Buttery Garlic Topping
This is my absolute favorite part – it takes these sliders from good to unbelievably amazing!
- Melt the Butter: In a small microwave-safe bowl, melt the butter (20-30 seconds).
- Mix the Spices: Stir in the garlic powder and Italian seasoning into the melted butter until well combined.
- Brush the Tops: Generously brush this glorious garlicky butter mixture over the tops of the slider buns. This gives them that golden, crispy, incredibly flavorful crust. Don’t be shy!
Baking to Perfection
Almost there! Now, let the oven do its work.
- Cover and Bake: Loosely cover the baking dish with aluminum foil. This helps the cheese melt evenly and prevents the buns from browning too quickly. Bake for 15 minutes.
- Uncover and Brown: Remove the foil and continue to bake for another 5-10 minutes, or until the tops are golden brown and the cheese is bubbly and melted.
- Rest and Serve: Once out of the oven, let them rest for a few minutes before slicing and serving. This allows the cheese to set slightly, making them easier to cut and preventing a cheesy mess. Garnish with fresh parsley, if desired.
Tips for the Best Chicken Parmesan Sliders
Over the years, I’ve picked up some tricks to make this Chicken Parmesan Sliders recipe absolutely perfect every time.
- Don’t Overstuff: Stick to the recipe amounts; too much filling can make them soggy and hard to handle.
- Pre-cooked Chicken is a Game Changer: Using rotisserie chicken means these sliders can be ready in less than 30 minutes. If cooking chicken from scratch, try my Savory Lemon Herb Roasted Chicken recipe and shred the leftovers.
- Season Your Chicken: Even plain cooked chicken benefits from a quick sprinkle of salt, pepper, garlic powder, or Italian seasoning before adding the sauce. This layers the flavor.
- Choose a Good Marinara: The marinara sauce is a prominent flavor, so pick one you truly enjoy. You can even check out reviews for top-rated store-bought marinara sauces on sites like Serious Eats for recommendations.
- The Butter Topping is Non-Negotiable: Don’t skip the garlicky butter topping! It gives the buns a beautiful golden crust and an incredible flavor boost.
- Let Them Rest: Resting for 5-10 minutes after baking allows the cheese to set, making them much easier to slice and serve.
- Adjust Baking Time: Ovens vary, so keep an eye on your sliders. You want the cheese bubbly and the tops golden, not burnt. If browning too quickly, loosely re-cover with foil.
Variations and Substitutions
Part of the fun of cooking is making a recipe your own! Here are some ideas to switch up your Chicken Parmesan Sliders:
- Spice It Up: Add a pinch of red pepper flakes to your marinara sauce or directly onto the chicken for a little kick.
- Different Cheeses: While mozzarella and Parmesan are classic, provolone, fontina, or a mix of Italian cheeses would be delicious.
- Add Veggies: Sautéed mushrooms, finely diced bell peppers, or spinach can be added to the chicken layer for extra nutrition. Ensure they’re cooked down to avoid excess moisture.
- Make it Meatless: Swap the chicken for cooked eggplant slices (lightly breaded and baked first) or hearty roasted mushrooms for a vegetarian twist on Chicken Parmesan Sliders.
- Homemade Marinara: If you have extra time, a homemade marinara sauce will always take these to the next level.
- Garlic Bread Sliders: For an even more intense garlic flavor, lightly toast the cut sides of the buns with butter and garlic powder before assembling.
- Different Buns: While Hawaiian rolls are my favorite, brioche slider buns also work wonderfully for a richer flavor.
How to Store and Reheat
These sliders are best fresh, but don’t worry, leftovers are still fantastic!
- Storage: Allow any leftover Chicken Parmesan Sliders to cool completely. Store them in an airtight container in the refrigerator for up to 3-4 days. You can keep them whole or slice them first.
- Reheating in the Oven: My preferred method! Preheat your oven to 300°F (150°C). Place the sliders on a baking sheet, loosely covered with foil, and bake for 10-15 minutes, or until heated through. Uncover for the last few minutes if you want the tops to crisp up again.
- Reheating in the Microwave: This works in a pinch, but the buns might get a little softer. Place individual sliders on a microwave-safe plate and heat for 30-60 seconds, or until warmed through. Be careful not to overheat.
- Air Fryer: Reheating in the air fryer at 300°F (150°C) for 5-7 minutes can get them deliciously crispy again!
Frequently Asked Questions
Got questions about this Chicken Parmesan Sliders recipe? I’ve got answers!
Can I prepare these Chicken Parmesan Sliders ahead of time?
Yes, you can! Assemble the sliders up to the point of brushing with the butter topping. Cover tightly with plastic wrap and refrigerate for up to 24 hours. When ready to bake, uncover, brush with the butter mixture, and bake as directed, adding a few extra minutes (about 5-10 minutes) to the initial covered baking time since they’ll be cold.
What can I serve with Chicken Parmesan Sliders?
These are hearty enough on their own, but they pair wonderfully with a simple green salad, crispy french fries, or a cup of your favorite soup. For a truly Italian meal, try serving them alongside a small bowl of Carrabba’s bread dipping oil or some roasted broccoli.
Can I freeze Chicken Parmesan Sliders?
I don’t recommend freezing assembled, unbaked sliders as the buns can get soggy when thawed. You can, however, freeze the cooked chicken and marinara mixture separately. Then, when you’re ready to make the sliders, just thaw the mixture and assemble as usual.
More Easy Recipes to Try
If you loved this Chicken Parmesan Sliders recipe, I know you’ll adore some of my other quick and comforting meals!
- For another crowd-pleaser, check out my Creamy Chicken Spinach Pasta recipe.
- If you’re a fan of chicken and pasta, you absolutely have to try these Chicken Alfredo Pasta recipes.
- And for another handheld favorite, my Pulled Pork Nachos recipe is always a hit!
I am SO excited for you to try this Chicken Parmesan Sliders recipe. It’s one of those dishes that brings so much joy with minimal effort! Whether you’re making them for a party or just a cozy night in, they are pure comfort food perfection. If you try this recipe, please let me know how it goes in the comments below!
Helpful References:
Print
Chicken Parmesan Sliders recipe: Chicken Parmesan Sliders
- Total Time: 40
- Yield: 12 sliders 1x
Description
These easy Chicken Parmesan Sliders bring the classic flavors of Italian comfort food into a convenient, bite-sized package. Tender chicken, rich marinara, and gooey mozzarella cheese are nestled in buttery, garlicky toasted slider buns. This recipe is perfect for a quick weeknight meal, a party appetizer, or a game-day snack.
Ingredients
- 12-pack Hawaiian slider buns
- 1.5 cups cooked chicken, shredded or diced
- 1.5 cups marinara sauce
- 1.5 cups shredded mozzarella cheese
- 0.5 cup grated Parmesan cheese
- 4 tablespoons unsalted butter, melted
- 2 cloves garlic, minced
- 0.5 teaspoon Italian seasoning
- Pinch of red pepper flakes (optional)
- 2 tablespoons fresh parsley, chopped (for garnish)
Instructions
- Preheat your oven to 375°F (190°C). Prepare a baking dish (9×13 inch or similar) by lightly greasing it or lining it with parchment paper for easy cleanup.
- Carefully slice the entire block of slider buns in half horizontally, keeping them connected. Place the bottom halves of the buns into the prepared baking dish in a single layer.
- In a medium bowl, combine the shredded or diced cooked chicken with 1 cup of the marinara sauce, ensuring the chicken is well coated.
- Spoon the chicken mixture evenly over the bottom halves of the slider buns in the baking dish. Spread it out to cover the surface.
- Sprinkle half of the shredded mozzarella cheese over the chicken layer, then evenly distribute the remaining 0.5 cup of marinara sauce over the cheese.
- Place the top halves of the slider buns over the filling. In a small bowl, whisk together the melted butter, minced garlic, Italian seasoning, and optional red pepper flakes.
- Brush the garlic butter mixture generously over the tops of the slider buns. Ensure each bun is well coated for maximum flavor and browning.
- Sprinkle the remaining half of the mozzarella cheese and all of the grated Parmesan cheese over the top of the buns. This will create a cheesy, golden crust.
- Cover the baking dish loosely with aluminum foil. Bake for 15 minutes, allowing the cheese to begin melting and the buns to warm through.
- Remove the foil and bake for an additional 10-15 minutes, or until the tops are golden brown, the cheese is bubbly and fully melted, and the filling is heated through. Watch carefully to prevent burning.
- Once baked, remove the dish from the oven. Let the sliders cool for 5 minutes before garnishing with fresh chopped parsley. Serve warm and enjoy your cheesy Chicken Parmesan Sliders.
Notes
- For extra flavor, lightly toast the bottom buns before adding the chicken mixture.
- If using raw chicken, cook and shred it first. Using leftover rotisserie chicken is a great time-saver.
- Ensure the garlic butter is generously brushed over the tops for a golden, flavorful crust.
- Consider adding a slice of provolone cheese under the mozzarella for an extra layer of melted goodness.
- Add a dash of dried oregano or basil to the garlic butter for more Italian aroma.
- These sliders can be assembled ahead of time, covered, and refrigerated for up to 24 hours. Let them come to room temperature for about 15-20 minutes before baking for best results.
- Leftover sliders can be stored in an airtight container in the refrigerator for up to 3 days. Reheat in a microwave or oven until warmed through.
- Explore other delicious chicken recipes like this Savory Lemon Herb Roasted Chicken Recipe Made Easy for more meal inspiration.
- Prep Time: 10
- Cook Time: 30
- Category: Main Course
- Method: Baking, Mixing
- Cuisine: Italian-American
Nutrition
- Serving Size: 2 sliders
- Calories: 420 kcal
- Sugar: 8 g
- Sodium: 850 mg
- Fat: 22 g
- Saturated Fat: 10 g
- Unsaturated Fat: 10 g
- Trans Fat: 0.5 g
- Carbohydrates: 30 g
- Fiber: 2 g
- Protein: 25 g
- Cholesterol: 70 mg
Keywords: Chicken Parmesan Sliders, easy chicken sliders, chicken parm, party food, game day snack, quick dinner, cheesy chicken, Italian sliders, family meal, baked sliders