What I love most about this chili is how dependable it is. You do not need complicated steps or fancy ingredients. The real flavor comes from giving each layer a little time: softening the onions, browning the beef, blooming the spices, and letting everything simmer until the sauce turns thick and comforting.
This is the chili I would make on a cold evening, for game day, or anytime I want something filling that tastes even better the next day. Serve it with cheddar, sour cream, green onions, and tortilla chips, and you have a bowl that feels complete.
Why You’ll Love This Hearty One-Pot Chili
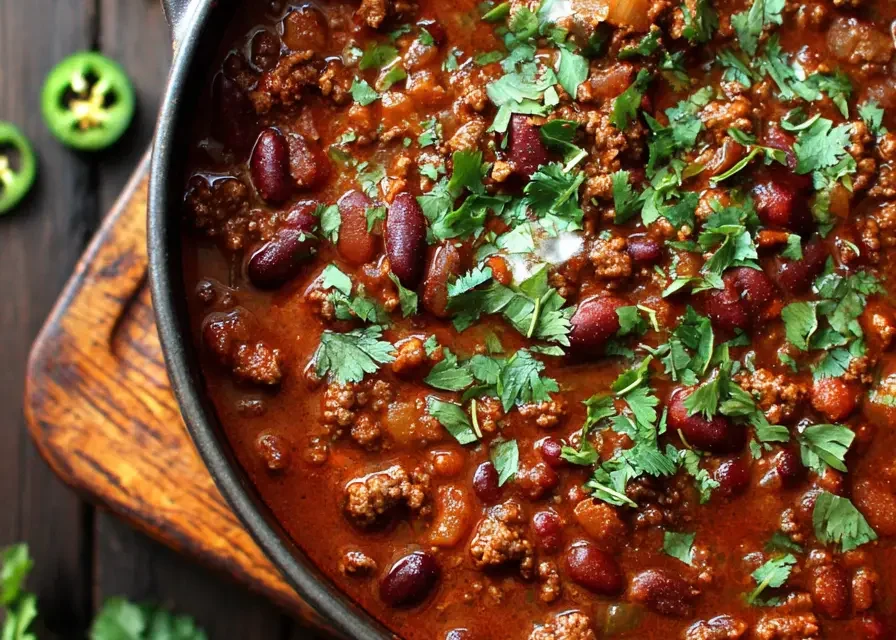
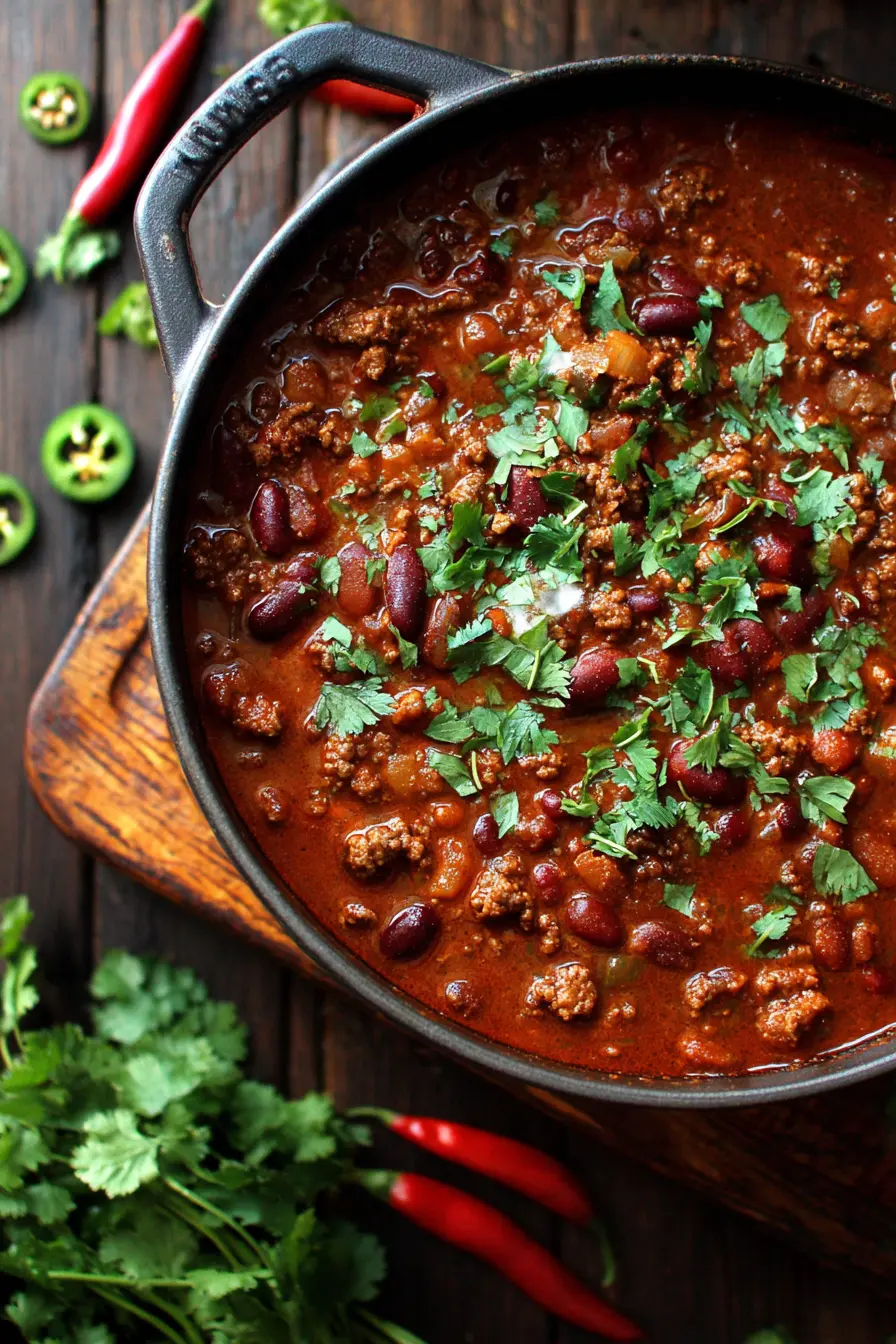
This recipe is simple, but it has that deep homemade flavor everyone wants in a good chili. The beef gives it richness, the beans make it hearty, and the tomatoes create a thick sauce that coats every spoonful.
You’ll love this recipe because it uses one pot, which means less cleanup and more flavor staying right where it belongs. It is also easy to adjust. You can make it mild, spicy, thicker, thinner, beefier, or more bean-heavy depending on what you like.
Another reason this chili works so well is that it reheats beautifully. The flavors continue to blend as it rests, so leftovers often taste even better the next day.
The Secret to Better Chili Flavor
The biggest secret to a flavorful chili is not just the simmering time. It is what happens before the liquid goes in.
When the onion, jalapeños, garlic, beef, tomato paste, and spices cook together in the pot, they create the base of the entire recipe. This is where the chili starts to taste rich instead of flat.
Let the tomato paste cook for a minute or two with the spices. It should darken slightly and smell deeper. This small step helps remove the raw tomato taste and gives the chili a warmer, fuller flavor.
Once the broth, tomatoes, and beans are added, the simmer brings everything together. The beef softens, the beans release a little starch, and the sauce naturally thickens into that classic spoon-coating chili texture.
Ingredients You’ll Need
Ground Beef
Use 2 pounds of lean ground beef. I like 85% to 90% lean because it gives enough richness without making the chili greasy. If your beef has a higher fat content, you can drain some of the fat after browning, but leave a little behind for flavor.
Onion
One large diced onion adds sweetness and depth. Let it soften before adding the beef so the flavor blends smoothly into the chili.
Jalapeños
Use 2 to 3 diced jalapeños depending on how much heat you like. Remove the seeds for a milder chili, or keep some seeds in if you want more spice.
Garlic
Fresh garlic makes a big difference here. Six cloves may sound like a lot, but it gives the chili that deep savory flavor that makes it taste homemade.
Chili Powder
Chili powder is the main spice in this recipe. It gives the chili its warm, bold flavor. If you have a smoky chili powder blend, even better.
Ground Cumin
Cumin adds earthy warmth and helps round out the beef and tomatoes.
Cayenne Pepper
Cayenne is optional, but it gives the chili a stronger heat. Start with a small amount because you can always add more later.
Tomato Paste
Tomato paste adds concentrated richness. Cooking it briefly before adding the liquid makes the chili taste deeper and less acidic.
Beef Broth
Beef broth adds body and helps carry the flavor through the whole pot. Low-sodium broth is best because it lets you control the salt.
Diced Tomatoes and Crushed Tomatoes
Diced tomatoes add texture, while crushed tomatoes create the thick sauce. Together, they give the chili a balanced texture.
Kidney Beans
Kidney beans make the chili hearty and satisfying. Rinse and drain them before adding unless you want a thicker, starchier base.
How to Make Hearty One-Pot Chili
Step 1: Cook the Aromatics
Heat oil in a large heavy-bottomed pot or Dutch oven over medium heat. Add the diced onion and jalapeños. Cook for 2 to 3 minutes, stirring often, until they begin to soften and look glossy.
Add the garlic and cook for about 1 minute. Stir constantly so the garlic does not burn. You want it fragrant, not browned.
Step 2: Brown the Beef
Add the ground beef to the pot. Break it apart with a wooden spoon and let it cook until no pink remains, about 5 to 6 minutes.
Try not to stir nonstop. Letting the beef sit for short moments helps it brown instead of steam. Browning adds flavor, so this step matters.
Step 3: Bloom the Spices
Stir in the chili powder, cumin, cayenne, salt, black pepper, and tomato paste. Cook everything together for 1 to 2 minutes.
This step helps the spices wake up and gives the tomato paste a richer taste. The mixture should smell warm, deep, and slightly toasted.
Step 4: Add the Tomatoes, Beans, and Broth
Pour in the beef broth, diced tomatoes, crushed tomatoes, and kidney beans. Stir well, scraping the bottom of the pot to lift up any browned bits.
Those little browned bits carry a lot of flavor, so do not leave them stuck to the bottom.
Step 5: Simmer the Chili
Bring the chili to a gentle boil, then reduce the heat to low. Let it simmer uncovered for 30 to 60 minutes, stirring occasionally.
The longer it simmers, the thicker and deeper it becomes. Keep the heat low enough that the chili bubbles gently. A hard boil can reduce the liquid too quickly and make the flavor taste harsh.
Step 6: Rest and Serve
Once the chili is thick and rich, taste it and adjust the seasoning. Add more salt, cayenne, or hot sauce if needed.
Let the chili rest for 10 minutes before serving. This helps the texture settle and makes the flavor even better.
Tips for the Best One-Pot Chili
Use a heavy pot if possible. A Dutch oven or heavy-bottomed pot holds heat evenly and helps prevent scorching while the chili simmers.
Do not skip the spice-blooming step. Adding spices directly into liquid can make them taste dull. Cooking them briefly with the beef and tomato paste makes the flavor stronger and warmer.
Let the chili simmer uncovered. This allows extra liquid to evaporate and helps the sauce thicken naturally.
Taste at the end, not too early. Tomatoes can taste sharp at first, but the acidity softens as the chili cooks.
If your chili tastes too acidic after simmering, add a tiny pinch of sugar or a small knob of butter to smooth it out.
How to Thicken Chili
If your chili is thinner than you want, let it simmer uncovered for a little longer. This is the easiest and best way to thicken it without changing the flavor.
You can also mash a small scoop of beans against the side of the pot and stir them back in. The beans release starch and naturally thicken the sauce.
If the chili becomes too thick, add a splash of broth or water and stir until it loosens. Add liquid slowly so you do not water down the flavor.
Easy Chili Variations
For a smokier chili, add smoked paprika or a little chipotle powder.
For a milder chili, skip the cayenne and replace the jalapeños with bell peppers.
For a bean-heavy chili, add one extra can of beans and reduce the beef slightly.
For a lighter version, use ground turkey or ground chicken. Since they are leaner, you may want to add a little extra seasoning or olive oil.
For a brighter finish, squeeze a little fresh lime juice into the chili right before serving.
What to Serve with Chili
This chili is delicious with classic toppings like shredded cheddar, sour cream, sliced green onions, cilantro, jalapeños, tortilla chips, or hot sauce.
You can serve it with cornbread for a cozy meal, or spoon it over rice, baked potatoes, or fries for something extra filling.
It also works well as a topping for nachos, chili dogs, or stuffed tortillas. The texture is thick enough to hold up without becoming watery.
How to Store Leftovers
Let the chili cool, then store it in an airtight container in the refrigerator for up to 4 days. It will thicken as it sits, so add a splash of broth or water when reheating if needed.
You can also freeze chili for up to 3 months. Let it thaw overnight in the refrigerator before reheating for the best texture.
Reheat on the stovetop over medium-low heat, stirring occasionally. You can also microwave it in short intervals, stirring between each one.
Make-Ahead Tips
This chili is perfect for making ahead. Cook it fully, let it cool, and refrigerate it overnight. The next day, the flavor will be even deeper and the texture will be thicker.
If you are making it for a gathering, prepare it one day in advance and reheat it gently before serving. Keep toppings separate so they stay fresh.
You can also chop the onions, jalapeños, and garlic ahead of time to make cooking faster.
Ingredients
- 2 tablespoons oil
- 1 large onion, diced
- 2 to 3 jalapeños, diced
- 6 garlic cloves, minced
- 2 pounds lean ground beef
- 3 tablespoons chili powder
- 1 tablespoon ground cumin
- 1 teaspoon cayenne pepper, optional
- 2 tablespoons tomato paste
- 1 1/2 cups beef broth
- 1 can diced tomatoes, 15 ounces
- 1 can crushed tomatoes, 15 ounces
- 2 cans red kidney beans, drained and rinsed
- Salt and black pepper, to taste
Optional Toppings
- Shredded cheddar cheese
- Sour cream
- Green onions
- Cilantro
- Jalapeño slices
- Hot sauce
- Tortilla chips
Instructions
- Heat the oil in a large pot or Dutch oven over medium heat.
- Add the onion and jalapeños. Cook for 2 to 3 minutes, until softened.
- Add the garlic and cook for 1 minute, stirring constantly.
- Add the ground beef and break it apart with a spoon. Cook for 5 to 6 minutes, until browned and no pink remains.
- Stir in the chili powder, cumin, cayenne, salt, black pepper, and tomato paste. Cook for 1 to 2 minutes to deepen the flavor.
- Add the beef broth, diced tomatoes, crushed tomatoes, and kidney beans. Stir well and scrape the bottom of the pot.
- Bring the chili to a boil, then reduce the heat to low.
- Simmer uncovered for 30 to 60 minutes, stirring occasionally, until thick and flavorful.
- Taste and adjust the seasoning if needed.
- Let the chili rest for 10 minutes before serving with your favorite toppings.
Notes
- For mild chili, remove the jalapeño seeds and skip the cayenne.
- For thicker chili, simmer uncovered longer or mash some of the beans into the sauce.
- For thinner chili, add a small splash of broth or water.
- This chili tastes even better the next day after the flavors have rested.
- Store leftovers in the refrigerator for up to 4 days or freeze for up to 3 months.
Frequently Asked Questions
Can I make this chili less spicy?
Yes. Remove the seeds from the jalapeños, skip the cayenne pepper, or use bell peppers instead. You will still get a rich chili flavor from the beef, tomatoes, chili powder, and cumin.
Can I use ground turkey instead of beef?
Yes. Ground turkey works well, but it has a lighter flavor than beef. Add a little extra seasoning and a small drizzle of olive oil if needed.
Why is my chili watery?
Chili can become watery if it has too much liquid or has not simmered long enough. Let it simmer uncovered until it thickens. You can also mash some of the beans to help thicken the sauce.
Does chili taste better the next day?
Yes. Chili usually tastes better the next day because the spices, tomatoes, beef, and beans have more time to blend together. Reheat it gently and add a splash of broth if it gets too thick.
Can I freeze this chili?
Yes. Let the chili cool completely, then freeze it in airtight containers for up to 3 months. Thaw overnight in the refrigerator before reheating.
Final Thoughts
This hearty one-pot chili recipe is simple, cozy, and full of flavor. It is the kind of meal that does not need much fuss, just a little patience and the right layering of ingredients.
Make it for a family dinner, meal prep, game day, or a cold night when you want something warm and satisfying. Add your favorite toppings, grab a spoon, and enjoy a bowl of rich homemade chili
PrintOne-Pot Chili Recipe with Beef and Beans
- Prep Time: 10
- Cook Time: 49
- Total Time: 59 minutes
- Category: American
- Cuisine: American
Description
This hearty one-pot chili delivers deep, slow-built flavor with tender beef, creamy beans, and a rich tomato base. The method focuses on browning, blooming spices, and a steady simmer to create a thick, cohesive texture. It’s dependable, flexible, and perfect for weeknights when you want something satisfying without extra cleanup. If you enjoy robust tomato bases, you might also like this Marinara Sauce for another flavor-packed staple.
Ingredients
- 1 lb ground beef (80/20, for best flavor)
- 1 tbsp olive oil (extra virgin)
- 1 medium yellow onion, diced (about 1 cup)
- 3 cloves garlic, minced (fresh)
- 2 tbsp tomato paste (concentrated)
- 1 can (14 oz) crushed tomatoes (no salt added)
- 1 can (15 oz) kidney beans, drained and rinsed
- 1 can (15 oz) black beans, drained and rinsed
- 1 cup beef broth (low sodium)
- 1 tbsp chili powder (adjust to taste)
- 1 tsp ground cumin (freshly ground if possible)
- 1 tsp smoked paprika
- 1/2 tsp dried oregano
- 1/2 tsp salt (plus more to taste)
- 1/4 tsp black pepper (freshly cracked)
- 1/4 tsp cayenne pepper (optional, for heat)
Instructions
- Heat Oil: Place a heavy pot over medium heat (about 350°F surface) for 2 minutes until the oil shimmers and flows easily.
- Brown Beef: Add ground beef and cook for 6–8 minutes at 350°F, breaking it up until browned with no pink and lightly crisp edges.
- Add Onion: Stir in diced onion and cook 4–5 minutes at 350°F until softened and translucent with a slight golden color.
- Add Garlic: Add minced garlic and cook 60 seconds at 325°F until fragrant but not browned.
- Bloom Tomato Paste: Stir in tomato paste and cook 2–3 minutes at 325–350°F until it darkens slightly and sticks lightly to the pot.
- Add Spices: Add chili powder, cumin, paprika, oregano, salt, pepper, and cayenne; cook 1–2 minutes at 325°F until aromatic and deepened in color.
- Deglaze: Pour in beef broth and scrape the bottom for 1–2 minutes at 350°F until browned bits dissolve and liquid looks uniform.
- Add Tomatoes and Beans: Stir in crushed tomatoes and beans; bring to a gentle boil at 375°F over 5 minutes until bubbles steadily break the surface.
- Simmer: Reduce heat to low (around 300°F) and simmer uncovered for 20 minutes, stirring occasionally, until thickened and spoon-coating.
- Final Adjust: Taste and adjust salt or spice; simmer 2–3 more minutes at 300°F until flavors are balanced and chili holds its shape on a spoon.
Notes
- Substitution: Ground turkey or plant-based crumbles can replace beef; add 1 tsp extra oil for moisture.
- Make-ahead: Chili can be made up to 2 days in advance; flavor improves as it rests.
- Storage: Refrigerate in an airtight container for up to 4 days.
- Freezing: Freeze for up to 3 months; thaw overnight in the refrigerator before reheating.
- Reheating: Warm on stovetop over medium-low heat (300°F) for 10–12 minutes, adding 2–3 tbsp water if too thick.
- Serving: Top with shredded cheese, sour cream, or chopped green onions; serve with cornbread or rice.