
Unlike oven baking, which can dry out the exterior before the inside cooks through, the air fryer uses rapid air circulation to cook evenly from all sides. That means better texture, faster cook time, and less guesswork. Once you dial in a few small details—like thickness and timing—you’ll be able to repeat this recipe with confidence every time.
This guide focuses on practical technique, not just ingredients. You’ll learn how to control moisture, heat, and airflow so your chicken turns out right every time, regardless of the air fryer model you’re using.
Why This Method Gives You Juicy, Never-Dry Chicken
Dry chicken usually comes down to two things: not enough moisture going in and too much heat pulling it out. A 15-minute saltwater brine fixes the first problem fast. The salt dissolves some muscle proteins so they hold onto water as the chicken cooks, which means a noticeably juicier bite. Even a short brine changes the texture in a way you can feel immediately.
High, circulating heat from the air fryer handles the outside. Preheating to 375°F creates a quick sear so the surface turns lightly golden while the inside climbs steadily to 165°F. Flip once and you avoid pale spots and overcooked edges. That balance—moisture inside, controlled heat outside—is what makes this version dependable.
Thickness matters just as much as temperature. Chicken breasts that are uneven will cook unevenly, with thin ends drying out before thicker centers are done. If needed, gently pound thicker sections to an even thickness so everything finishes at the same time.
Another small but important factor is carryover cooking. Once you remove the chicken from the air fryer, the internal temperature will continue to rise slightly as it rests. Pulling it right at 165°F—and not beyond—keeps the texture tender instead of firm.
If you want a deeper dive into dialing in moisture and timing, this breakdown of three secrets to juicy air fryer chicken lines up exactly with what’s happening here.
Choosing the Best Chicken Breasts
Not all chicken breasts cook the same, and starting with the right cut makes a noticeable difference. Look for pieces that are similar in size and thickness so they cook evenly in the same batch. Large, uneven breasts often benefit from slicing in half horizontally to create thinner cutlets that cook faster and more consistently.
Fresh chicken tends to retain moisture better than previously frozen cuts, but both can work well if handled properly. If using frozen and thawed chicken, make sure it’s fully thawed and patted very dry before seasoning to avoid excess surface moisture.
Air-chilled chicken is another good option if available. It typically has less retained water, which helps with browning and prevents steaming inside the air fryer.
Why You’ll Love This Air Fryer Chicken Breast Recipe
- Consistently juicy, even with thicker breasts that usually turn chalky in the oven.
- Lightly crisp edges without breading—just oil and spices doing their job.
- Fast and efficient: about 30 minutes start to finish, including the brine.
- Customizable flavor so you can keep it simple or change it up each time.
- Minimal cleanup compared to stovetop or oven roasting.
- Perfect for meal prep—it reheats well and stays tender for days.
- No complicated steps, just a few techniques that make a big difference.
A 4.5-quart air fryer like this makes the recipe easier: juicy chicken inside, lightly golden edges outside, less oil, and quick cleanup for busy weeknight dinners.

Cuisinart 4.5-Quart Air Fryer
Shop the Air Fryer »What You’ll Need
Main Protein / Base
- Boneless skinless chicken breasts (6–8 oz each) – Lean and quick-cooking. Choose pieces that are similar in size for even cooking. If one is much thicker, consider slicing it in half horizontally.
- Warm water + kosher salt – The quick brine seasons throughout and locks in moisture. Kosher salt dissolves easily and distributes flavor evenly.
Aromatics
- Garlic powder – Gives depth without burning. Fresh garlic can scorch under high airflow.
- Onion powder – Adds subtle sweetness and balances savory notes.
Spices
- Smoked paprika – Adds color and a mild smoky flavor that mimics grilling.
- Black pepper – Light heat that enhances everything else.
- Dried thyme (optional) – A gentle herbal note that pairs naturally with chicken.
- Optional additions – Chili powder for heat, Italian seasoning for a herby mix, or lemon zest for brightness.
Liquid or Sauce
- Olive oil or avocado oil – Helps spices stick and promotes browning. Use just enough to lightly coat.
Other
- Cooking spray – Prevents sticking and helps airflow crisp the surface evenly.
- Instant-read thermometer – The most reliable way to avoid overcooking.
Ingredient Notes and Smart Substitutions
If you don’t have kosher salt, reduce the amount slightly when using table salt since it’s more concentrated. For oil, any neutral oil works, but avoid butter during cooking—it can burn under high air fryer heat. You can add butter after cooking for flavor instead.
Chicken tenderloins can be used instead of full breasts, but they cook faster—usually in 10–12 minutes total—so keep a close eye on them. Bone-in breasts are not recommended for this method, as they require different timing and can cook unevenly in an air fryer.
If you’re watching sodium, you can shorten the brine to 10 minutes or rinse lightly after brining, though that slightly reduces the seasoning effect.
For added flavor without extra salt, consider dry spices like cumin, coriander, or smoked chili blends. Acidic finishes such as lemon juice or vinegar added after cooking can also enhance flavor without increasing sodium.
A 4.5-quart air fryer like this makes the recipe easier: juicy chicken inside, lightly golden edges outside, less oil, and quick cleanup for busy weeknight dinners.
Cuisinart 4.5-Quart Air Fryer
Shop the Air Fryer »How to Make Air Fryer Chicken Breast Recipe
Brine & Prep
- Step 1: Brine the chicken – Stir 1 tablespoon kosher salt into 2 cups warm water until dissolved. Submerge the chicken for 15 minutes at room temperature.
- Step 2: Dry thoroughly – Pat completely dry with paper towels. A dry surface is essential for browning.
Season & Preheat
- Step 3: Preheat the air fryer – Set to 375°F (190°C) and preheat for 3 minutes.
- Step 4: Season evenly – Rub with oil, then coat with spices. Press seasoning gently so it adheres.
Air Fry the Chicken
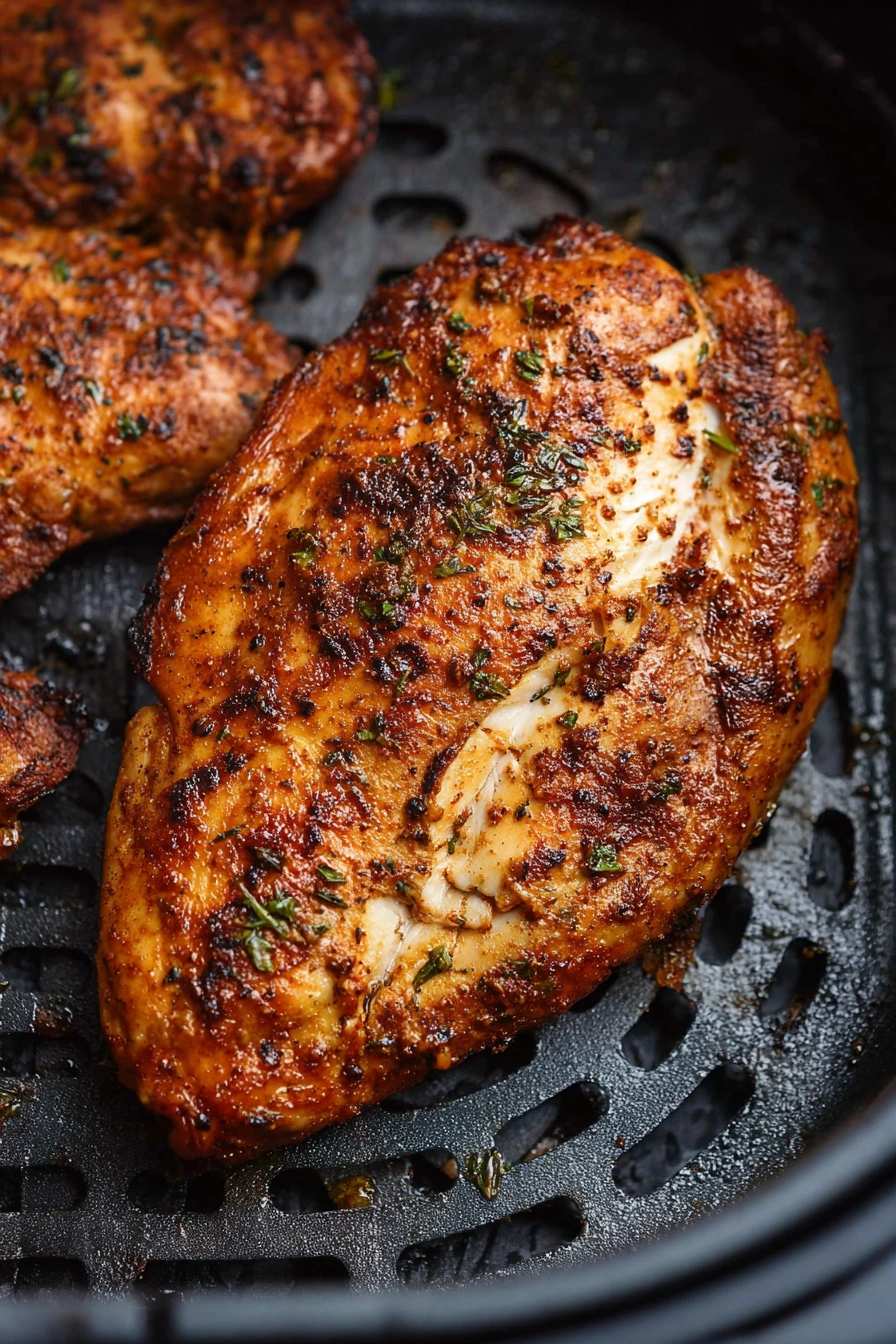
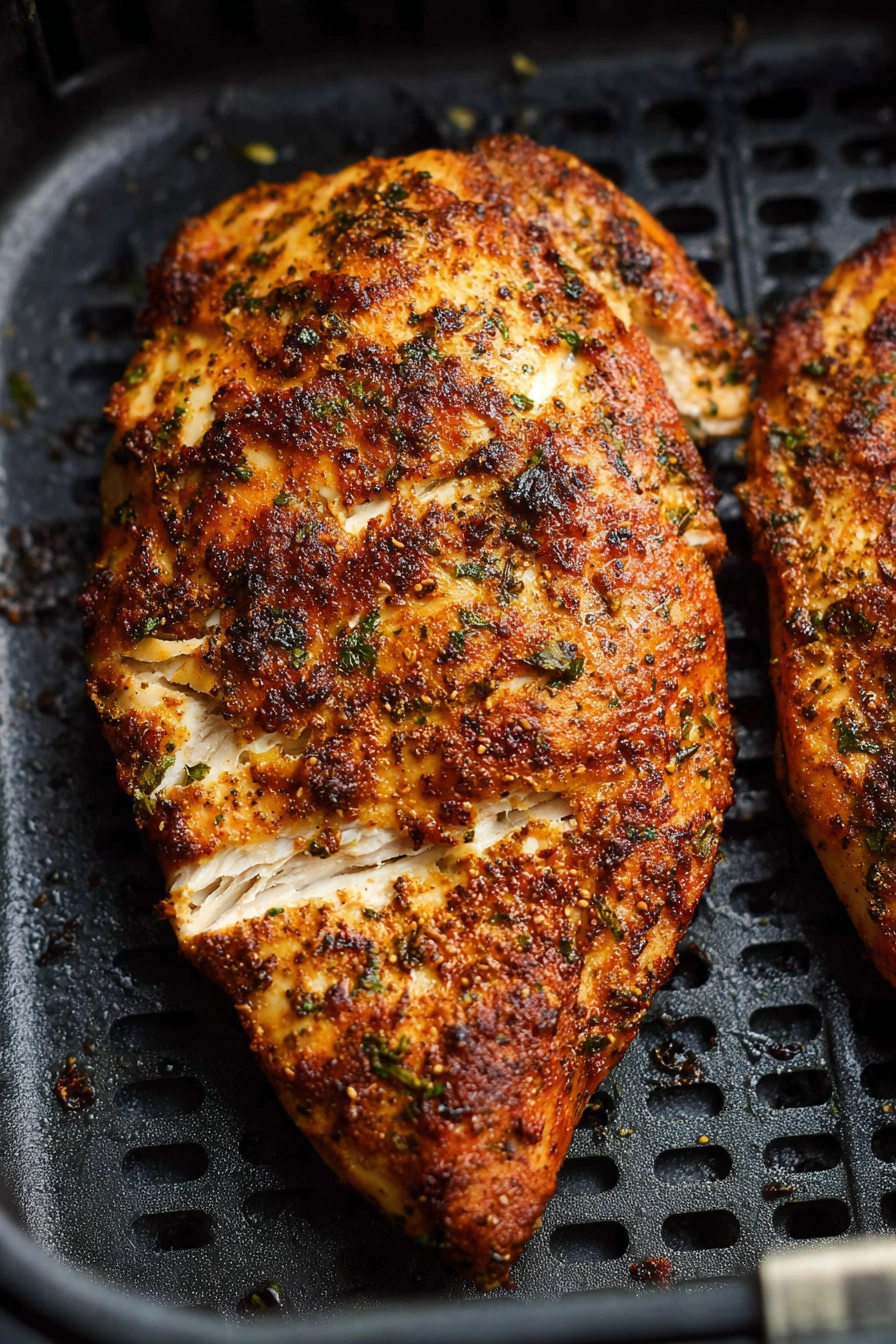
- Step 5: Arrange in basket – Place in a single layer with space between pieces.
- Step 6: Cook first side – Air fry for 10 minutes until lightly golden.
Flip & Finish Cooking
- Step 7: Flip and continue cooking – Cook another 8–10 minutes, checking early for doneness.
- Step 8: Check doneness – Internal temperature should reach 165°F (74°C).
Rest & Slice
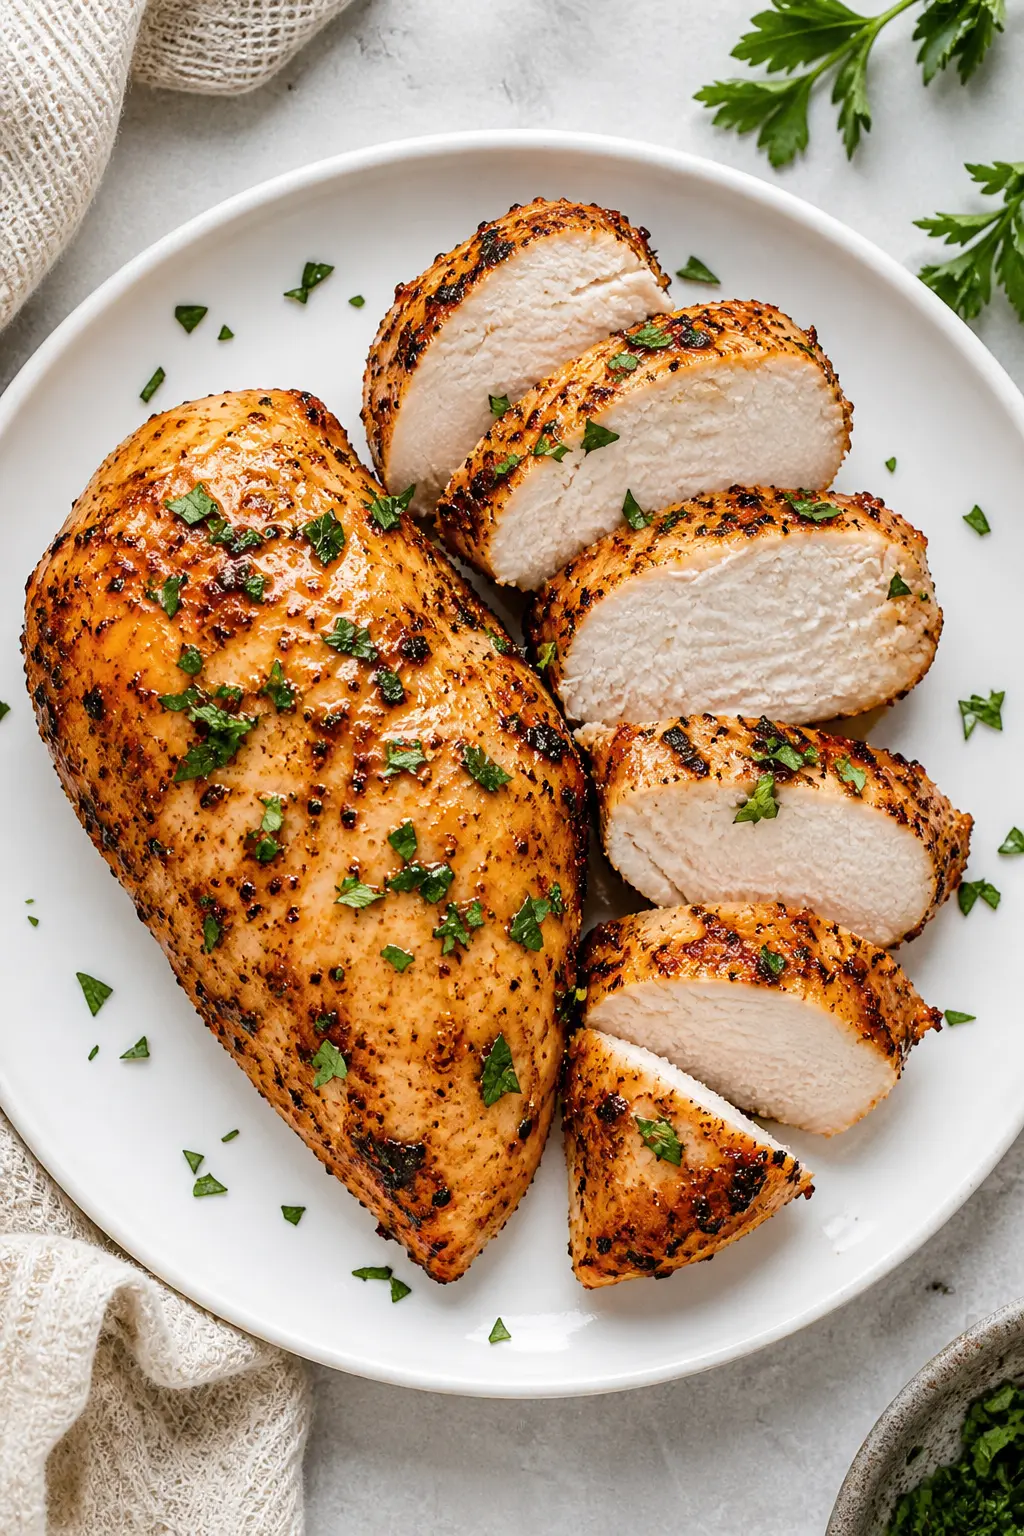
- Step 9: Let it rest – Rest 5 minutes to retain juices.
- Step 10: Slice and serve – Slice against the grain and adjust seasoning if needed.
For a second reference on timing and spacing, this step-by-step air fryer chicken breast guide shows how small layout changes affect browning.
Understanding Air Fryer Differences
Not all air fryers cook identically. Basket-style models tend to cook faster due to more concentrated airflow, while oven-style air fryers may need an extra minute or two. Always check doneness a bit early the first time you try this recipe in a new machine.
If your air fryer runs hot, you may notice faster browning on the outside. In that case, reduce the temperature slightly to 360°F and extend cooking time by a minute or two to prevent the exterior from overcooking before the inside is done.
Timing Guide by Size
Not all chicken breasts cook the same, so adjusting for size helps avoid overcooking.
- Small (5–6 oz): 14–16 minutes total
- Medium (7–8 oz): 18–20 minutes total
- Large (9–10 oz): 20–22 minutes total
Always rely on internal temperature rather than time alone, since air fryer models vary slightly in heat intensity.
Flavor Variations and Seasoning Ideas
This base recipe is intentionally simple, but you can easily change the flavor without changing the method. Swap spices while keeping the same cooking process.
- Lemon herb: Add lemon zest, dried oregano, and a squeeze of lemon after cooking.
- Spicy: Add cayenne or chili flakes for heat.
- Garlic parmesan: Finish with grated parmesan and a light brush of melted butter.
- BBQ: Brush with barbecue sauce during the last 2 minutes of cooking.
- Honey garlic: Use a thin glaze like this easy honey garlic sauce for a sweet-savory finish.
- Tex-Mex: Add cumin, chili powder, and a squeeze of lime.
- Simple classic: Just salt, pepper, and olive oil for a clean, versatile base.
Pro Tips for Best Results
- Don’t skip drying: Moisture prevents browning.
- Use even thickness: Pound thicker ends lightly for uniform cooking.
- Avoid overcrowding: Airflow is key to crisp edges.
- Check early: Chicken can go from perfect to overdone quickly.
- Rest every time: It makes a noticeable difference in juiciness.
- Light oil only: Too much oil can make the surface soggy instead of crisp.
- Flip gently: Use tongs to avoid tearing the surface.
- Season just before cooking: This prevents moisture from being drawn back to the surface.
A 4.5-quart air fryer like this makes the recipe easier: juicy chicken inside, lightly golden edges outside, less oil, and quick cleanup for busy weeknight dinners.
Cuisinart 4.5-Quart Air Fryer
Shop the Air Fryer »Troubleshooting Common Issues
- Chicken is dry: Likely overcooked or skipped brine. Use a thermometer and pull at 165°F.
- Not browning: Surface may be too wet or air fryer not preheated.
- Uneven cooking: Pieces are different sizes or too crowded.
- Rub falling off: Not enough oil or chicken too wet before seasoning.
- Too salty: Brined too long or didn’t dry properly before seasoning.
- Rub burning: Reduce sugar-heavy spices or lower temperature slightly.
How to Serve It
Serve it sliced over salads, grain bowls, pasta, or in wraps. It pairs well with roasted vegetables, rice, quinoa, or even mashed potatoes for a more filling meal.
For extra flavor, finish with fresh herbs, citrus juice, or a light sauce. Even a simple drizzle of olive oil and squeeze of lemon can brighten everything.
This chicken also works well chilled and sliced thin for sandwiches, protein boxes, or quick lunch bowls. Try layering it with hummus, greens, and warm pita for an easy meal.
If you’re serving guests, slice and fan it out on a platter, then drizzle with sauce or sprinkle with herbs for a simple but polished presentation.
You can also cube the cooked chicken for tacos, add it to soups at the end of cooking, or toss it into stir-fries for a quick protein boost without additional cooking time.
Storage and Reheating
- Fridge: Store up to 4 days in an airtight container.
- Freezer: Freeze up to 2 months. Slice before freezing for easier use.
- Reheating: Air fry at 350°F for 4–5 minutes or until warmed through.
- Microwave option: Cover with a damp paper towel to retain moisture.
- Tip: Add a little oil or broth before reheating to keep it moist.
FAQ
How long do you cook chicken breast in the air fryer?
About 18–20 minutes at 375°F, flipping halfway. Always check for 165°F internally.
Do I need to brine the chicken?
No, but it improves juiciness and seasoning significantly.
Can I use frozen chicken breasts?
Thaw first for best results and even cooking.
Why is my chicken dry?
Usually overcooking. Use a thermometer and don’t skip resting.
Can I marinate instead of brine?
Yes, but keep it light and avoid excess sugar to prevent burning.
Related Recipes
If you liked this Air Fryer Chicken Breast Recipe, try more easy air fryer dinners:
- Air fryer chicken thighs
- Air fryer salmon
- Air fryer shrimp
- Air fryer vegetables
The BEST Air Fryer Chicken Breast In 10 MINUTES SUPER JUICY
- Prep Time: 10
- Cook Time: 30
- Total Time: 40
- Yield: 2 servings 1x
- Category: Main Course
- Method: Air Frying, Mixing
- Cuisine: American
- Diet: Gluten Free, Low Fat
Description
This air fryer chicken breast recipe delivers juicy, tender meat with lightly crisped edges in under 30 minutes. A quick saltwater brine and precise air frying ensure the chicken stays moist and flavorful. It’s a reliable, simple method perfect for weeknight meals or meal prep.
Ingredients
- 2 boneless skinless chicken breasts (about 6–8 oz each, trimmed and patted dry)
- 2 cups warm water (for brine)
- 1 tablespoon kosher salt (for brine)
- 1 tablespoon olive oil (or avocado oil for higher heat stability)
- 1 teaspoon garlic powder (finely ground)
- 1 teaspoon onion powder
- 1 teaspoon smoked paprika (or regular paprika)
- 1/2 teaspoon black pepper (freshly ground preferred)
- 1/2 teaspoon dried thyme (optional, for added aroma)
- Cooking spray (for greasing air fryer basket)
Instructions
- Prepare brine (15 minutes at room temperature): Dissolve salt in 2 cups warm water at about 100–110°F, then submerge chicken fully; it should look slightly plumped after soaking.
- Preheat air fryer (375°F for 3 minutes): Set air fryer to 375°F and preheat for 3 minutes until hot airflow is steady.
- Dry chicken (2 minutes): Remove chicken from brine, pat completely dry with paper towels; surface should feel dry, not slick.
- Season chicken (2 minutes): Rub both sides with olive oil, then evenly coat with garlic powder, onion powder, paprika, pepper, and thyme; surface should look evenly coated.
- Prepare basket (1 minute): Lightly spray basket with cooking spray; it should appear lightly glossy but not pooled.
- Arrange chicken (immediate): Place chicken breasts in a single layer without overlap; there should be space between pieces for airflow.
- Cook first side (375°F for 10 minutes): Air fry until tops turn lightly golden and edges begin to crisp.
- Flip and finish (375°F for 8–10 minutes): Flip carefully and continue cooking until internal temperature reaches 165°F and surface is evenly browned.
- Check doneness (immediate): Insert thermometer into thickest part; juices should run clear and meat should feel firm yet slightly springy.
- Rest and serve (5 minutes): Transfer to plate, cover loosely with foil, rest 5 minutes; juices redistribute and slices stay moist.
Notes
- Substitute spices with Italian seasoning, chili powder, or lemon pepper for different flavor profiles.
- Brine chicken up to 8 hours ahead; refrigerate during longer brining and pat dry before cooking.
- Store leftovers in an airtight container in the refrigerator for up to 4 days.
- Reheat in air fryer at 350°F for 4–5 minutes until warmed through; avoid over-microwaving to prevent dryness.
- Serve with roasted vegetables, in wraps, sandwiches, or sliced over salads for versatile meals.
- For extra flavor, brush with barbecue sauce or honey mustard during the last 2 minutes of cooking.
Nutrition
- Array
The quick brine and hot preheat made a huge difference—my chicken breast stayed juicy in the center with those lightly crisped edges the article promised. I followed the timing based on thickness and it came out perfect for our weeknight dinner.
★★★★★
I used this Air Fryer Chicken Breast Recipe for meal prep and the precise timing tips were spot on. The airflow in the air fryer really did cook it evenly, and it stayed tender even after reheating for lunches all week.
★★★★★