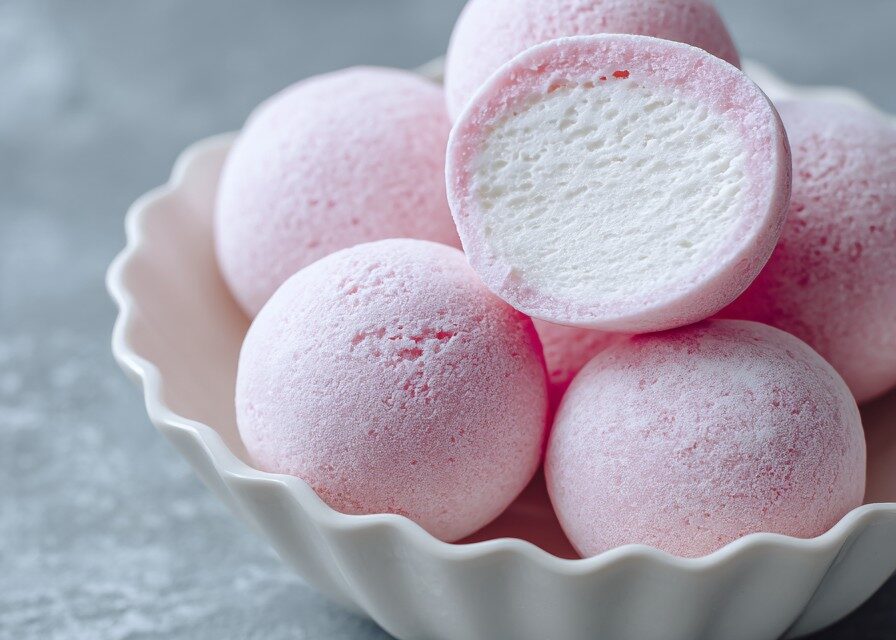
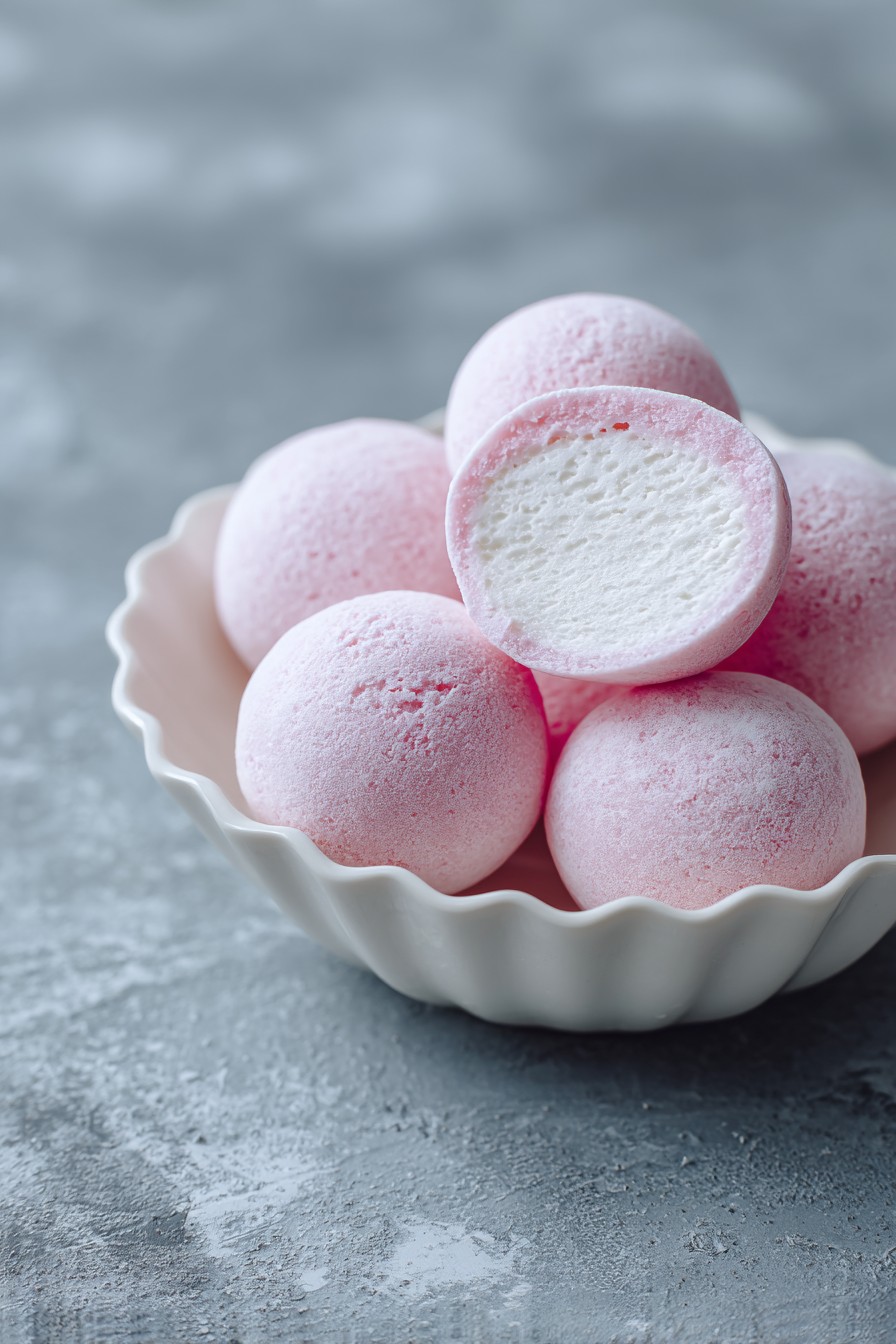
The Magic of Mochiko: Achieving Perfectly Chewy Mochi
This Mochi Ice Cream recipe succeeds thanks to the specific qualities of glutinous rice flour, also known as
mochiko, and the way it interacts with heat. Heat gelatinizes the starch in the mochiko, creating that signature
soft, chewy texture. Many recipes skip the crucial steps of covering the bowl during microwaving, which traps
steam and helps the mochi cook evenly, or don’t emphasize the need for incredibly vigorous stirring at each stage.
We’re going to pay attention to both of those to ensure the best result. Now, let’s get started!

Why You’ll Love This Mochi Ice Cream Recipe
- The combination of chewy mochi and smooth ice cream? It’s a party in your mouth.
- You can make these at home without any special equipment.
- The flavor possibilities are endless if you have a favorite ice cream.
- These little bites are naturally gluten-free.
- Mochi Ice Cream offers built-in portion control!
- A unique treat guaranteed to impress.
What You’ll Need
Mochi Dough
- Mochiko (Glutinous Rice Flour): This is the key ingredient. It provides the unique
chewy texture that defines mochi. Do NOT substitute regular rice flour; it just won’t work. Mochiko is made
from sweet rice, and the starch behaves very differently when cooked. Look for it in Asian supermarkets or online. - Granulated Sugar: Sugar adds sweetness, of course, but it also contributes to the soft and
pliable texture of the mochi. Use regular granulated sugar for best results. Powdered sugar can work in a pinch,
but may affect the final texture. - Water: Water hydrates the mochiko and helps create the smooth, almost paste-like dough we need.
Use filtered water for the best taste, although tap water will also work. - Cornstarch or Potato Starch: This dusting prevents sticking like crazy. It’s essential for
handling the mochi dough and shaping the final product. I always reach for potato starch because it’s reliably
fine and less prone to clumping. Tapioca starch is another good alternative. - Food Coloring (Optional): For adding a pop of color! Use gel food coloring for best results,
as liquid food coloring can alter the consistency of the dough slightly. Gel food coloring is more concentrated,
so you’ll need less of it. Powdered food coloring is another good option.

Ice Cream Filling
- Your Favorite Ice Cream: Anything goes! I find that richer, denser ice creams like gelato
or premium brands work best, as they tend to hold their shape better. Avoid ice creams with a lot of air
whipped into them, as they will melt too quickly. Experiment with different flavors to find your favorites! - Optional Additional Fillings: This is where you can get creative! Mini chocolate chips,
chopped nuts, crushed cookies, or even small pieces of fruit add extra texture and flavor. Just make sure to
use small pieces so they integrate well into the ice cream balls. Consider white chocolate chips with matcha
ice cream, or chopped macadamia nuts with vanilla ice cream.
How to Make Mochi Ice Cream
Prep the Ice Cream
- Step 1: Soften the Ice Cream: Let your ice cream sit at room temperature for about 5-10 minutes,
or until it’s soft enough to scoop easily. You want it pliable, but not soup. The exact time will depend on the
temperature of your kitchen and the type of ice cream you’re using. Don’t let it melt completely, or it will be
difficult to scoop. - Step 2: Scoop and Freeze: Use a small ice cream scoop (about 1 inch in diameter) to scoop out
ice cream balls. Place them on a parchment-lined baking sheet and freeze for at least 2-3 hours, or overnight.
Freezing them rock solid is critical to prevent a melty mess later. Make sure the ice cream balls aren’t touching
each other on the baking sheet, or they will freeze together.
Making the Mochi Dough
- Step 3: Combine Ingredients: In a large, microwave-safe bowl, whisk together the mochiko,
sugar, and water until completely smooth. Lumps will cause inconsistent cooking, so take your time here.
Use a whisk to break up any clumps of mochiko before you add the water. If you still have lumps after whisking,
you can try sifting the mochiko first. - Step 4: Microwave and Stir: Cover the bowl tightly with plastic wrap, leaving just a tiny vent
for steam to escape. Microwave on high for 1 minute. Remove carefully (the bowl will be hot!) and stir
extremely vigorously with a silicone spatula until the mixture is smooth and cohesive. The plastic wrap
helps to trap the steam, which is essential for creating the right texture. Make sure to use microwave-safe plastic wrap.
Step 5: Continue Microwaving
- Step 5: Continue Microwaving: Re-cover the bowl and microwave for another 1 minute. Stir again
with just as much vigor. The dough should be starting to look sticky and translucent. You’ll notice the dough
getting thicker and more gelatinous with each microwave interval. Don’t be afraid to really stir it well! - Step 6: Finish Cooking: Microwave for a final 30 seconds. Stir one last time. At this point,
the mochi should be very sticky, stretchy, and mostly translucent. If it still looks opaque or has any dry spots,
microwave for another 15-30 seconds. The exact cooking time may vary depending on your microwave, so keep an eye
on the dough and adjust accordingly. - Step 7: Dust and Knead: Generously dust a clean work surface with cornstarch or potato starch.
Turn the mochi dough out onto the dusted surface. Use the spatula to fold the dough over on itself a few times,
dusting with more starch as needed to prevent sticking. Be careful — the dough will be hot! Do not over-knead,
as this can make the mochi tough. Over-kneading develops the gluten, which will make the mochi chewy in a bad way.
We want soft and pillowy!
Assembling the Mochi Ice Cream
- Step 8: Cut and Flatten: Dust a rolling pin with cornstarch. Working quickly, roll out the
mochi dough to about 1/8 inch thickness. Use a round cookie cutter (about 3-4 inches in diameter) to cut out
circles. Re-dust the surface frequently to stop sticking. If you don’t have a cookie cutter, you can use a knife
or pizza cutter to cut out squares or other shapes. - Step 9: Wrap the Ice Cream: Working as fast as possible, place an ice cream ball in the center
of each mochi circle. Gently wrap the mochi around the ice cream, pinching the edges together to seal. The warmth
of your hands will soften the mochi, making it easier to mold. Make sure to completely enclose the ice cream ball,
or it will leak and make a mess. - Step 10: Freeze Again: Place the assembled mochi ice cream back on the parchment-lined baking
sheet and freeze for at least 1 hour to firm up. This final freeze is crucial to prevent the mochi ice cream
from becoming too soft and sticky. Freezing them for longer will also make them easier to handle and eat.
Expert Tips
- Make sure your ice cream balls are as frozen as possible before wrapping them. A slightly softened exterior is okay, but the core should be rock solid. If the ice cream is too soft, it will melt and make the mochi soggy.
- Microwave in shorter intervals: If you aren’t familiar with your microwave and how it cooks, it is better to microwave in 30 second intervals so you don’t end up with a rubbery mochi. Overcooking the mochi will make it tough and unpleasant.
- Work quickly: The warmer the dough, the stickier it will be. If the dough is becoming too difficult to handle, pop it in the fridge for a few minutes to cool down. Cooling the dough will make it easier to work with and prevent it from sticking.
- Don’t skip the generous dusting of cornstarch or potato starch. This is what keeps the mochi from sticking to everything. Trust me, you’ll thank me later!
- If your mochi dough is tearing, don’t panic! Just pinch it back together and keep going. The mochi is very forgiving, so don’t worry about imperfections.
- Seal tightly: Make sure to check that all edges are fully sealed. This will keep the ice cream from leaking and prevent freezer burn.
- Use a silicone mat: Instead of dusting your work surface directly, try using a silicone mat dusted with starch. This makes clean-up much easier!
- Flavor the starch: For an extra touch, mix a small amount of powdered flavor (like matcha or cocoa) into your cornstarch or potato starch before dusting.
- Make ahead: You can make the mochi dough a day in advance and store it in the refrigerator, tightly wrapped in plastic wrap. Let it come to room temperature before using.
Variations
- Flavor Combinations: Go wild! Match ice cream flavors with corresponding mochi dough colors using
food coloring. Strawberry ice cream in pink mochi is always a hit, or use matcha ice cream with green mochi for
a classic Japanese flavor. Vanilla ice cream with black sesame mochi is another delicious option. - Mochi Flavors: Infuse the mochi dough itself with extra flavor by adding a teaspoon of matcha
powder, cocoa powder, or strawberry puree along with the wet ingredients. You can also add a drop or two of extract,
like vanilla or almond. A little goes a long way! - Dairy-Free Option: Use your favorite non-dairy ice cream and double-check that your food coloring
is also dairy-free. There are many delicious dairy-free ice cream options available now, so you won’t have to
sacrifice flavor. Coconut-based ice creams work particularly well. - Different Shapes: Get creative with the shape of your mochi ice cream! Instead of using a round
cookie cutter, try using a square or heart-shaped cutter. You can also mold the mochi by hand into different shapes. - Sesame Seeds: Before freezing the assembled mochi, roll them in sesame seeds for added flavor and
texture. Black sesame seeds look particularly striking against a light-colored mochi. - Different Fillings: Instead of just ice cream, try filling the mochi with other delicious treats,
like ganache, custard, or even a small piece of fruit. Be sure to freeze the filling before wrapping it in mochi,
just like with the ice cream.
Storage / Reheating
- Freezer: Store finished mochi ice cream in an airtight container in the freezer for up to 2 weeks.
They’re at their best eaten within the first week for optimum texture. Over time, the mochi can become a bit hard and dry. - Separation: Prevent sticking by wrapping each mochi ice cream individually in plastic wrap or
parchment paper before freezing, or layering them in a container with parchment paper sheets in between. This will
make it easier to grab one or two without thawing the whole batch. - Thawing: No reheating needed! Simply take the mochi ice cream out of the freezer and let it sit
at room temperature for a few minutes to soften slightly before serving. But don’t let them sit at room temperature
too long, or they will be a big puddle. About 5-10 minutes is usually perfect.

FAQ
Why is my mochi dough so sticky?
Mochi dough is naturally sticky due to the glutinous rice flour. Generously coating your work surface,
rolling pin, and hands with cornstarch or potato starch is essential for preventing it from sticking everywhere.
How do I keep the ice cream from melting while I’m assembling?
Keeping the ice cream balls as cold as possible is key. Work quickly, and if they start to melt too much, pop them
back into the freezer for a few minutes to firm up again. Working in a cool room can also help.
Can I use a different type of flour instead of mochiko?
Unfortunately, glutinous rice flour (mochiko) is absolutely essential to achieve that signature chewy mochi texture.
Regular rice flour, wheat flour, or other alternatives simply won’t work in this recipe.
My mochi is rubbery – what did I do wrong?
You most likely overcooked the mochi in the microwave. Next time, try microwaving in shorter intervals. Start with
30 seconds and adjust from there.
Can I make these without a microwave?
Yes, you can! You’ll need to steam the mochi dough instead. Place the combined mochiko, sugar, and water in a
heatproof bowl and steam over boiling water for about 20-25 minutes, or until the dough is translucent and cooked through.
Be sure to stir it occasionally during steaming.
Helpful References:
- Strawberry Crunch Poke Cake Recipe
- Butter Cake With Coffee Cream And Caramel
- 20 Minute No Bake Key Lime Cheesecake Bars
Mochi Ice Cream
- Prep Time: 10
- Cook Time: 3
- Total Time: 13
- Yield: 12 servings 1x
- Category: Dessert
- Method: Mixing, No-Cook
- Cuisine: Japanese
- Diet: Gluten Free, Vegetarian
Description
Mochi Ice Cream is a delightful dessert that marries the chewy texture of mochi with the creamy coolness of ice cream. This recipe makes it surprisingly easy to create these perfectly portioned treats at home. The secret to success lies in using glutinous rice flour (mochiko) and ensuring proper hydration and cooking. Get ready to enjoy a unique and satisfying dessert experience.
Ingredients
- 1 cup mochiko (glutinous rice flour, not regular rice flour)
- 1/2 cup granulated sugar
- 1 cup water (filtered, if possible)
- 1/2 cup cornstarch or potato starch (for dusting)
- Food coloring (gel, optional)
- 1 pint ice cream (your favorite flavor, softened)
Instructions
- Prepare the Ice Cream: Scoop ice cream into small balls and place on a parchment-lined baking sheet. Freeze for at least 2 hours, or until solid.
- Mix Dry Ingredients: In a microwave-safe bowl, whisk together mochiko and sugar until well combined.
- Add Water: Gradually add water to the bowl, stirring until the mixture is smooth and there are no lumps.
- Microwave First Round: Cover the bowl with plastic wrap and microwave on high for 2 minutes.
- Stir Vigorously: Remove from the microwave and stir vigorously with a spatula until the mixture is smooth and translucent.
- Microwave Second Round: Cover again with plastic wrap and microwave on high for another minute.
- Stir Again: Remove from the microwave and stir vigorously again, ensuring the dough is smooth and sticky.
- Dust with Starch: Generously dust a clean surface with cornstarch or potato starch.
- Shape the Mochi: Turn the mochi dough out onto the dusted surface. Dust the top of the mochi with more starch and form it into a log.
- Cut and Flatten: Cut the mochi log into equal portions (about 12 pieces). Flatten each piece into a thin circle.
- Assemble Mochi Ice Cream: Place a frozen ice cream ball in the center of each mochi circle. Wrap the mochi around the ice cream, pinching the edges to seal.
- Freeze Again: Roll each assembled mochi ice cream in more starch and return to the freezer for at least 30 minutes to set.
Notes
- Substitution: If you can’t find mochiko, there isn’t a great substitute. Regular rice flour will not work.
- Make-Ahead: The mochi dough can be made a day ahead and stored in the refrigerator. Bring to room temperature before shaping.
- Storage: Store assembled mochi ice cream in an airtight container in the freezer for up to 1 week.
- Reheating: No reheating needed! Enjoy directly from the freezer. Leaving them out too long will cause the ice cream to melt.
- Serving Suggestions: Serve as a refreshing dessert or snack. Offer a variety of ice cream flavors for a fun and customizable experience.
Nutrition
- Array